My shopping cart
Your cart is currently empty.
Continue ShoppingYour heirloom-quality acoustic guitar is a living, breathing assembly of tonewoods that reacts to every shift in humidity and season. When that pristine resonance is suddenly interrupted by a persistent string buzz or an uncomfortably high action, it's rarely a sign of a failing instrument. Instead, it's usually a signal that your setup has drifted from its ideal state. You've likely felt that hesitation before reaching for a tool, fearing a wrong move might damage the delicate neck of your prized Collings or Taylor. It's a common anxiety among collectors who value master-grade craftsmanship above all else.
Mastering acoustic guitar neck relief measurement is the essential first step to reclaiming that effortless playability and rich harmonic depth. You'll gain the technical precision needed to evaluate your instrument's health with absolute confidence. This guide covers the specific tools required, the factory specifications for world-class brands like Martin and Gibson, and how to determine if your guitar requires a professional luthier's touch. Prepare to unlock the full tonal potential of your collection through the art of precise calibration and expert-level maintenance.
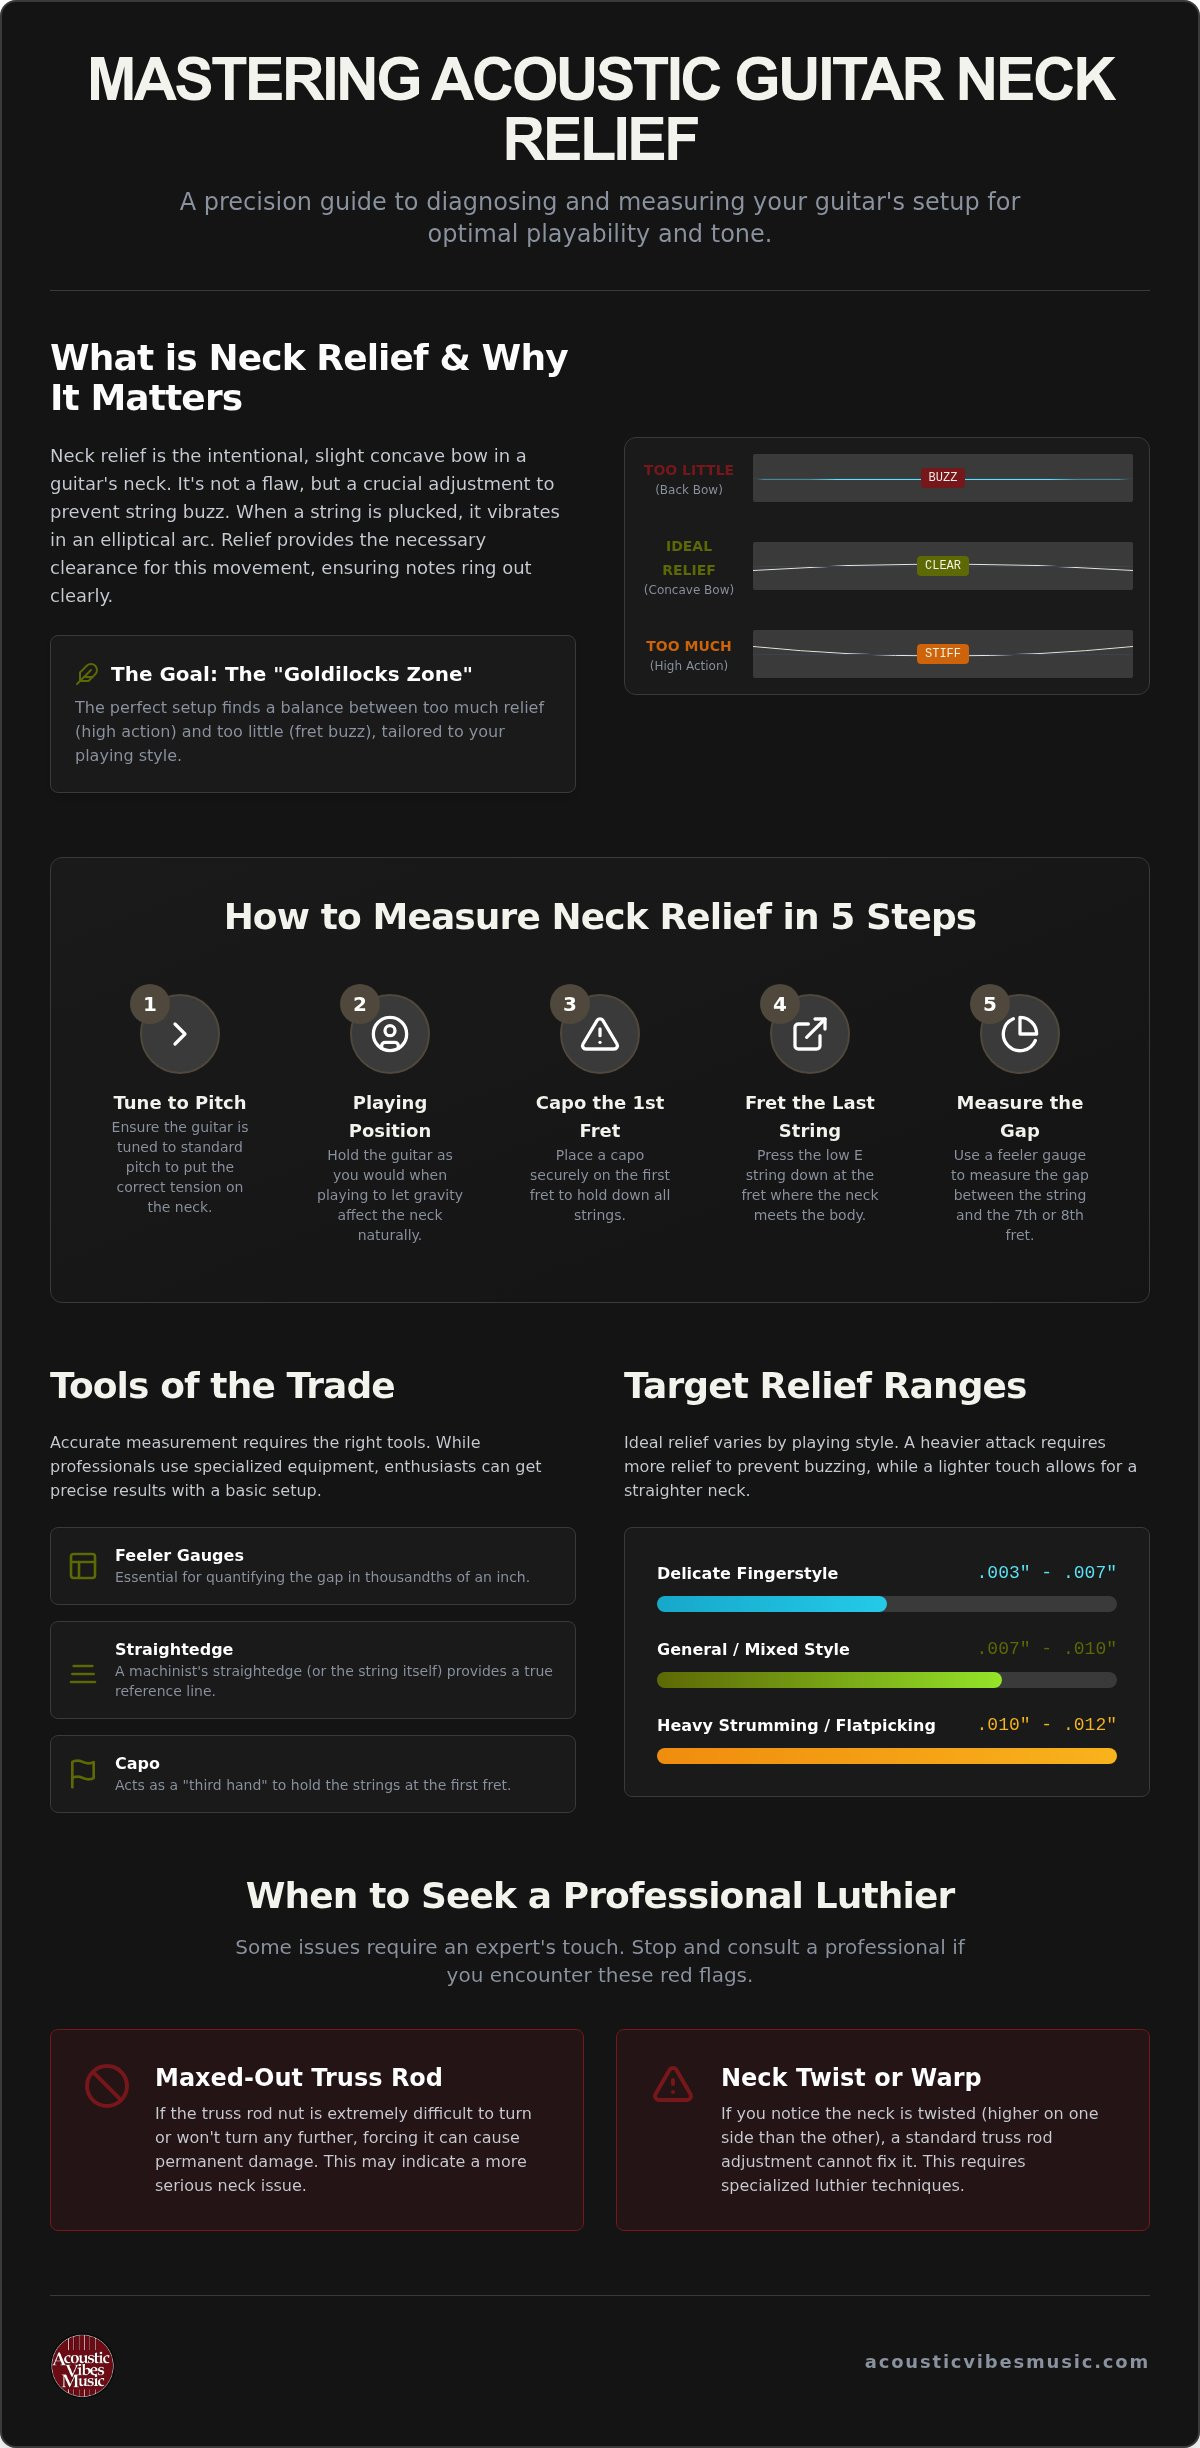
Think of your guitar neck as the foundation of your instrument's performance. Neck relief is the intentional, microscopic concave bow engineered into the fretboard to facilitate clean note production. It isn't a sign of warping; rather, it's a vital adjustment controlled by the Truss Rod. Without this slight curve, even the most expensive instrument becomes unplayable. Understanding this geometry is key to a professional setup. It's essential to distinguish relief from "action," which refers to the overall height of the strings, and "neck angle," which describes the pitch of the neck relative to the body. While action determines ease of fretting, relief specifically targets clarity in the lower and middle registers, particularly within the first seven frets.
When you pluck a string, it doesn't move back and forth in a straight line. It oscillates in an elliptical shape, vibrating most widely at the center of its length. If your fretboard were perfectly flat, the vibrating string would strike the frets, creating an abrasive "fret slap" or buzzing sound. This is where an accurate acoustic guitar neck relief measurement becomes critical. You're searching for the "Goldilocks zone." Too little relief causes buzz. Too much relief makes the action feel stiff and high. Your playing style dictates the ideal amount; a delicate fingerstyle player can thrive with a nearly flat neck, while a heavy-handed flatpicker needs more clearance for powerful strumming.
Heirloom-quality instruments require a higher level of vigilance. Master-built acoustics, such as those from Boucher Guitars or Collings, feature ultra-responsive tonewoods and lightweight bracing. These components make the guitar sing, but they also mean the neck reacts more sensitively to string tension and humidity shifts. Precision fretwork on these models often allows for a lower acoustic guitar neck relief measurement than a factory-standard instrument. However, maintaining that "edge of performance" requires regular monitoring. Treating your instrument with the reverence its craftsmanship demands ensures it remains a joy to play for decades. Every fraction of a thousandth of an inch matters when you're pursuing the perfect balance of resonance and playability.
Precision is the hallmark of any master luthier. When you're performing an acoustic guitar neck relief measurement on a world-class instrument, the quality of your data depends entirely on the caliber of your tools. A standard plastic ruler from a desk drawer won't suffice; you're looking for tolerances measured in thousandths of an inch. Professional setups often begin with a dedicated machinist's straightedge. This tool provides a perfectly flat reference point that spans the length of the fretboard, allowing you to see the subtle curve of the neck against a true line.
Alongside the straightedge, a set of feeler gauges is your most trusted ally. These thin metal leaves allow you to quantify the exact gap between the string and the fret, typically ranging from .003 to .012 inches. To make the process manageable, a quality capo is indispensable. It serves as an extra hand, pinning the strings at the first fret while you measure further down the neck. Finally, never underestimate the power of a well-lit environment. A clear, shadow-free bench allows you to see the minute gap where the feeler gauge meets the fret, ensuring your readings are consistent and reliable.
Many professionals prefer a notched straightedge. This specialized tool features cutouts that allow it to sit directly on the fingerboard wood, bypassing the frets entirely. This isolates the neck's curvature from any potential fret wear or unevenness. Before you begin, always check your straightedge for true flatness by holding it against a known flat surface or using the "light gap" test. For most premium acoustics with scale lengths between 24.9 and 25.4 inches, a 12 to 18 inch straightedge is the ideal length to cover the critical tension zones.
You don't need a workshop full of specialized hardware to get an accurate reading. By using a capo at the first fret and depressing the string where the neck meets the body, you can use the string itself as a straightedge. This method is highly effective for a quick acoustic guitar neck relief measurement at home. If you lack feeler gauges, a standard business card is approximately .010 inches thick, which can serve as a rough guide for a medium-action setup. The tap test is a quick qualitative check for relief existence, where you tap the string over the 7th fret while it's fretted at both ends to listen for a microscopic click of space.
While these DIY methods are excellent for routine checks, fine-tuning a boutique instrument often requires the steady hand of a specialist. If you find your measurements are inconsistent, our professional luthier services can provide the expert calibration your guitar deserves. For more detailed specifications on different neck radii, you can explore this guide on How to Measure Neck Relief to see how manufacturer standards vary across the industry.
Precision begins with preparation. Before you attempt an acoustic guitar neck relief measurement, your instrument must be tuned exactly to pitch. Measuring a neck without string tension is a futile exercise; the truss rod's primary function is to counteract the hundreds of pounds of pressure exerted by the strings. If that tension is absent, your readings won't reflect the guitar's actual state during performance. You should also hold the guitar in the playing position. Gravity is a subtle but persistent force. Laying a guitar flat on a workbench can cause the neck to settle differently than when it's cradled in your arms. This can lead to microscopic inaccuracies that compromise a high-end setup.
This technique is the industry standard for a quick, reliable assessment without needing a full shop setup. It utilizes the string itself as a perfectly straight reference line to reveal the curvature of the wood beneath.
Numbers provide the data, but your playing style provides the necessary context. Most factory specifications for Taylor Guitars and Martin models fall within a range of .004 to .010 inches. These aren't rigid laws, though. A bluegrass flatpicker driving a dreadnought with heavy picks often prefers a more generous relief of .012 inches to prevent buzz during aggressive solos. Conversely, a fingerstyle player using a sensitive instrument like a Lowden might aim for a nearly flat .003 inches. This minimal gap rewards a light touch with surgical precision and effortless speed.
For those seeking laboratory-level accuracy, the precision straightedge method remains the ultimate choice. Instead of relying on the string, you place a machined edge directly across the frets. This allows you to perform an acoustic guitar neck relief measurement across the entire span of the fretboard rather than just under a single string. It's particularly useful for identifying high frets or localized inconsistencies that the string method might overlook. When you're dealing with the tight tolerances of a boutique build, this extra layer of scrutiny protects the integrity of the instrument's design and your investment.
Your acoustic guitar is a high-precision humidity sensor. Because tonewoods are hygroscopic, they constantly exchange moisture with the surrounding air. This cellular-level movement is the primary reason an acoustic guitar neck relief measurement taken in the humid height of July might be completely invalid by the dry depths of January. Wood expands as it absorbs moisture and contracts as it dries out. This cycle directly impacts the tension balance between the strings and the neck, causing the wood to shift in ways that can baffle even experienced collectors.
The specific species of your neck wood dictates how dramatically these shifts occur. Mahogany is prized for its stability and warm resonance, yet it remains more reactive to humidity than the denser, stiffer Maple found on some specialty builds. The fretboard material also plays a role in this geometric dance. Ebony is incredibly dense and provides a rigid surface; Rosewood is slightly more porous and flexible. When these woods are joined, they react at different rates. This creates internal stresses that manifest as subtle changes in your neck's curvature.
When relative humidity drops below the ideal 45% to 55% range, the wood begins to shrink. As the neck loses moisture, it often pulls backward against the string tension. This creates a "back-bow," where the middle of the fretboard rises toward the strings. The result is severe buzzing on the lower frets and a choked-off resonance. Conversely, excessive humidity causes the top to swell and the neck to soften, which often results in an increased forward bow and uncomfortably high action. For a deeper dive into how these materials behave under environmental stress, see our guide on Rosewood vs. Mahogany Back and Sides.
If you've recently traveled or moved your instrument between different climates, resist the urge to adjust the truss rod immediately. Precision requires patience. You should wait at least 24 to 48 hours for the wood to acclimate to its new environment before performing an acoustic guitar neck relief measurement. During this window, the wood fibers settle into their new equilibrium. For owners of boutique instruments like those from Collings Guitars or Martin, consistent case humidification is the best defense against seasonal drift. If your measurements fluctuate wildly despite a stable environment, it's often a sign of a localized humidity crisis rather than a mechanical failure of the neck itself.
Keeping your instrument stable is a full-time commitment to its longevity. If you find that environmental shifts are making your instrument difficult to play, exploring our curated collection of world-class acoustic guitars can help you find models known for their exceptional road-worthy stability.
Precision is a virtue, but caution is a necessity. While mastering your own acoustic guitar neck relief measurement is an empowering skill, there is a definitive line where DIY maintenance ends and professional luthier intervention must begin. Fine instruments are built to exacting tolerances. Forcing a component that resists movement can lead to catastrophic structural failure. Knowing when to step back isn't an admission of defeat; it's a sign of a truly dedicated curator who prioritizes the long-term health of their collection over a quick fix.
One of the most critical warning signs is a "maxed out" truss rod. If you feel significant resistance or hear an audible creak when attempting a minor adjustment, stop immediately. This indicates the rod has reached the end of its travel or is seized. Applying more pressure can snap the rod or compress the wood of the neck beyond repair. Similarly, if your measurements reveal that the relief hasn't changed after a careful adjustment, there may be a deeper mechanical issue within the neck's internal structure that requires a specialist's touch.
A healthy neck should show consistent curvature across its width. If your acoustic guitar neck relief measurement yields wildly different results on the Low E string versus the High E string, you're likely dealing with a twisted neck or a localized "S-curve." These complex geometries cannot be solved by a simple truss rod turn. These issues often require fret leveling or, in extreme cases, fingerboard planing. If you notice that your bridge is lifting or the top is "bellying" while you're checking your relief, you should investigate our guide on Acoustic Guitar Bridge Repair Cost to understand how these structural symptoms often overlap.
At Acoustic Vibes Music, we view a guitar setup as a unified system of harmonic balances. Neck relief doesn't exist in a vacuum; it interacts directly with nut slot depth and saddle height. When we handle a world-class Collings or a vintage-spec Martin, our luthiers evaluate every variable to ensure the instrument performs with the resonance it was designed for. We don't just "fix" a buzz; we calibrate the entire geometry of the instrument to suit your unique touch and tonal preferences. If your measurements have left you with more questions than answers, it's time to schedule a professional evaluation. Let us provide the expert hand that restores your heirloom to its peak playability.
Your journey toward a perfectly calibrated instrument begins with the technical precision of an acoustic guitar neck relief measurement. By understanding the delicate relationship between string tension and tonewood response, you've taken the first step in ensuring your guitar performs exactly as its master builders intended. Remember that a stable environment is your best ally; consistent monitoring is the key to preserving that effortless playability you cherish.
If your measurements reveal a need for deeper structural attention, or if you're simply ready to add a new masterpiece to your collection, we're here to guide you. As an authorized dealer for Martin, Taylor, and Collings, we provide expert luthier services for premium maintenance and offer nationwide shipping on our entire boutique inventory. Explore our curated collection of world-class acoustic guitars and discover the difference that professional-grade setup and selection can make. Your next breakthrough in tone is just a few thousandths of an inch away.
You should perform an acoustic guitar neck relief measurement at least twice a year during seasonal transitions. Wood reacts to shifts in humidity between summer and winter, which directly alters the neck's curvature. If you notice new buzzing or a change in playability, check it immediately. For those who travel between different climates, monthly monitoring ensures your setup remains stable. Regular checks help you catch minor movements before they require a major luthier intervention.
No, you cannot get an accurate reading without strings. The purpose of the truss rod is to balance the specific tension of your strings. Without that tension, the neck will naturally pull into a back-bow or sit perfectly flat; this doesn't reflect how the instrument performs while you play. Always tune your guitar to pitch and hold it in the playing position before you begin your assessment to ensure the data is valid.
The factory standard for a Martin D-18 typically ranges between .004 and .010 inches. Most players find that .006 or .008 inches provides the perfect balance of clarity and comfort. While Martin's precision fretwork allows for a relatively flat setup, your individual attack matters. Heavy strummers might prefer the higher end of that range to prevent string slap, while fingerstyle players often lean toward the lower measurement for a faster feel.
Yes, changing string gauges will significantly impact your acoustic guitar neck relief measurement. Heavier strings exert more pounds of tension on the neck, which pulls it forward and increases the relief. Conversely, switching to lighter strings reduces tension, which can cause the neck to straighten or even develop a back-bow. Any time you switch brands or gauges, you must re-evaluate your relief and likely perform a minor truss rod adjustment to maintain your preferred action.
It's generally safer to have slightly too much relief than too little. Insufficient relief leads to immediate buzzing on the first few frets and a "choked" sound that kills sustain. However, excessive relief makes the guitar feel stiff and difficult to play in the middle of the neck. The goal is to find the minimum amount of clearance your playing style requires to stay clean. A balanced setup provides the resonance your boutique instrument was designed for.
A back-bow is a serious issue that requires immediate attention by loosening the truss rod. This condition occurs when the neck curves away from the strings, causing them to sit too close to the frets. You'll notice severe buzzing or notes that don't ring out at all on the lower frets. If loosening the rod doesn't resolve the curve, it may indicate the wood has dried out excessively. In such cases, professional humidification or luthier services are necessary.
You don't strictly need a notched straightedge, but it offers the highest level of accuracy for professional work. A standard straightedge sits on top of the frets, which can be misleading if your frets are worn or uneven. A notched version bypasses the frets to measure the actual wood of the fingerboard. For most enthusiasts, the "string-as-straightedge" method is perfectly adequate for routine maintenance. If you're chasing laboratory-level precision, the specialized hardware is worth the investment.
Adjusting relief can lower the action slightly, but it isn't a primary fix for high action at the 12th fret. Neck relief mostly affects playability between the 1st and 7th frets. If the strings are uncomfortably high further down the neck, the issue is usually related to the saddle height or the neck angle itself. While a truss rod adjustment is part of a complete setup, significant height issues at the 12th fret often require a luthier to sand the saddle.