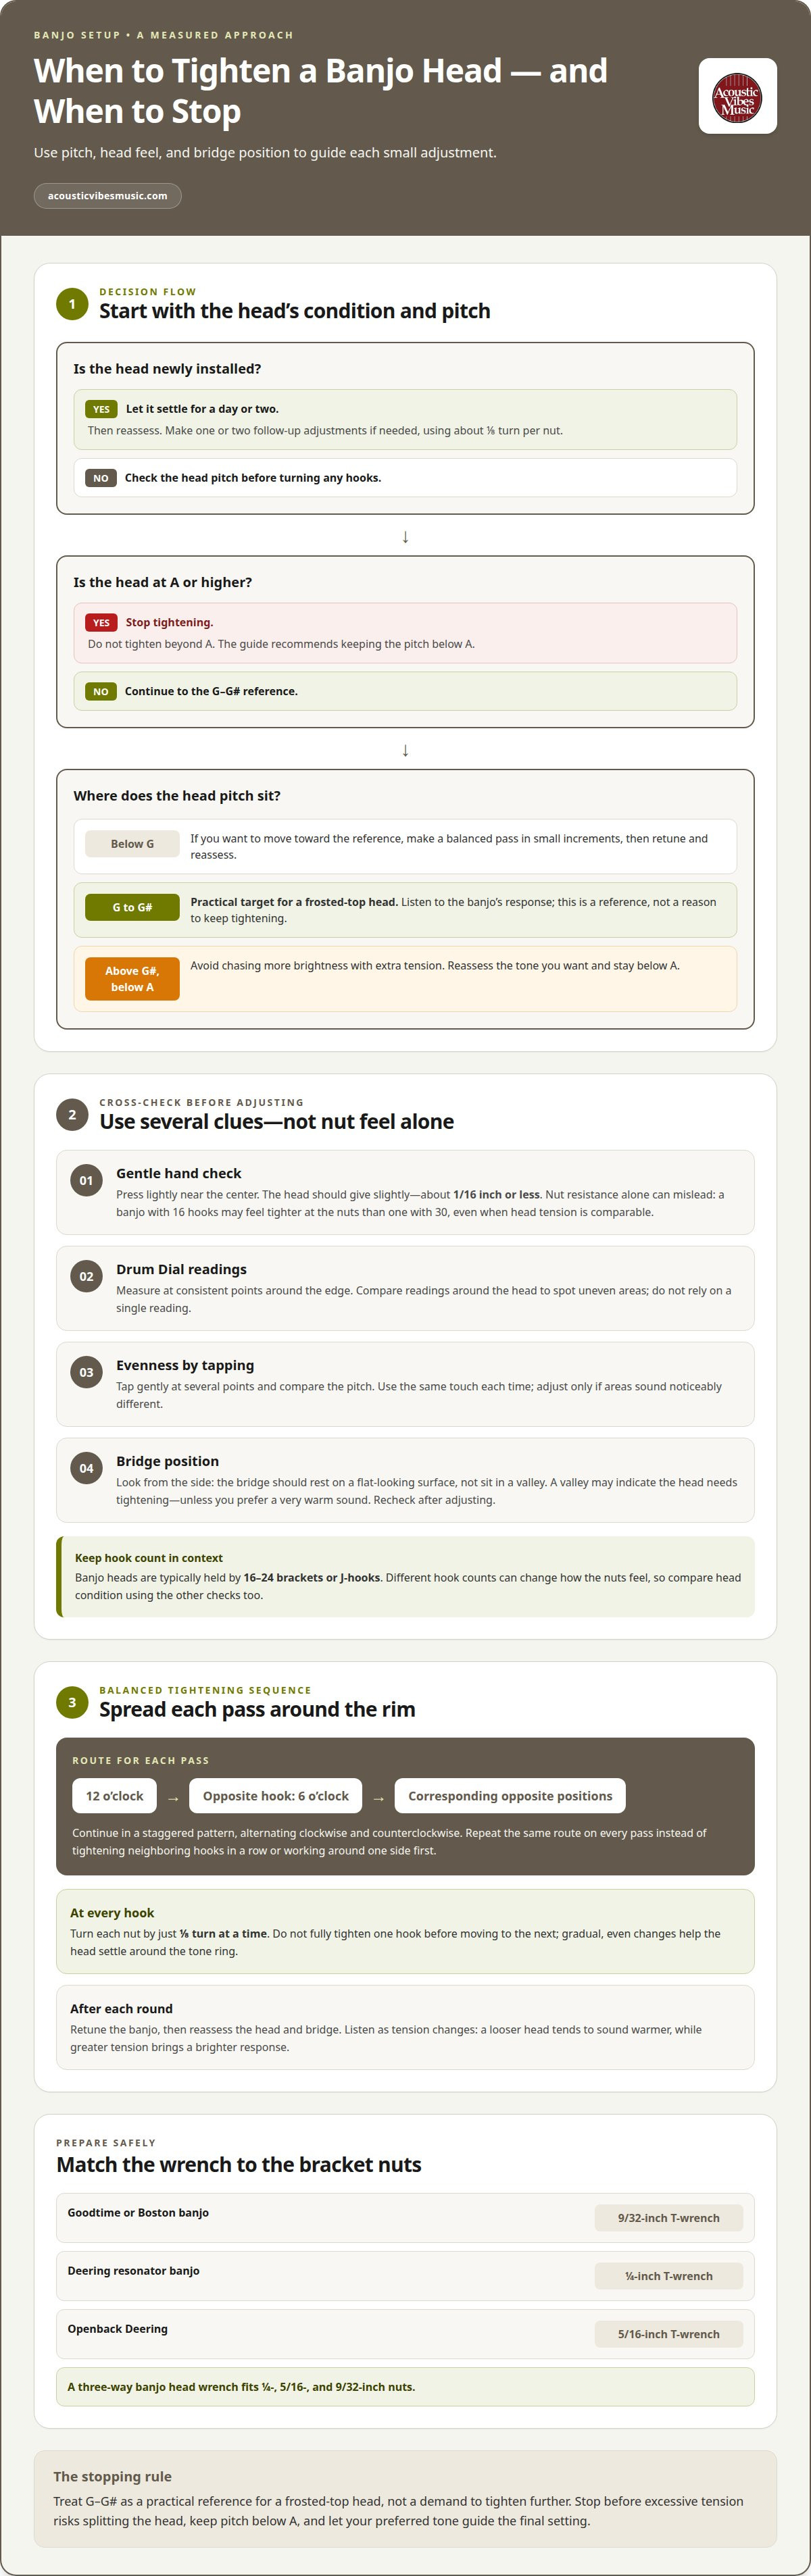
A banjo head should be firm, not forced tight: aim for a head note between G and G#, and don’t tighten it beyond A. For a careful banjo head tightening sequence, start at the 12 o’clock hook and work across the rim in a balanced pattern, adjusting each nut by just 1/8 turn at a time. After each round, retune the banjo and reassess the head and bridge.
It’s natural to wonder whether a small adjustment will help or whether one extra turn could damage the head. The key is to make measured, even changes and assess more than how the nuts feel: the head should give slightly under gentle pressure, and the bridge should rest on a surface that looks flat rather than dip into a valley.
This guide explains how to assess head tension and bridge position, follow a balanced banjo head tightening sequence, and know when to stop. Work patiently and listen as you go. Careful adjustments help protect the head while shaping the banjo’s response and tone.
Key Takeaways
Judge nut feel in context: banjos with different numbers of hooks can feel different even when the head tension is comparable.
Let tone guide your adjustment; a looser head tends to sound warmer, while greater tension brings a brighter response.
Use a wrench that fits your banjo’s bracket nuts, and tighten gradually so the head settles evenly around the tone ring.
Give a newly installed head time to settle before follow-up adjustments, and stop before excessive tension risks splitting it.
Assessing head tension by hand and bridge position
Check the head with a light touch, a consistent measuring method, and a careful look at the bridge. Together, these checks help you tell an even, firm surface from one that may need adjustment.
Check Head Tension by Hand
Press gently near the center of the head, then notice how far the surface yields. A head should give slightly; when checked by feel, it should depress about 1/16 inch or less. Avoid judging tension from nut resistance alone. A banjo with 16 hooks may feel tighter at its nuts than one with 30, even when the heads are similarly tensioned.
Measure Tension with a Drum Dial
Set a drum dial on the head and take readings at consistent points around the edge. Compare the readings to spot uneven areas; the dial gives you a repeatable way to assess tension. To measure banjo head tension with a drum dial, keep its placement consistent and compare readings around the head rather than relying on just one.
Tap for an Even Pitch
Tap gently at several points around the head and listen for a consistent pitch. To check for an even pitch, compare taps around the head and adjust only if some areas sound noticeably different. Use the same gentle touch each time and listen across the full surface, since a single tap can be difficult to judge.
Inspect the Bridge Position
Look across the bridge from the side and check whether it rests on a flat-looking surface. If it sits in a valley, the head may need tightening, unless you prefer a very warm sound. Even with a looser head, it should remain firm enough to hold the bridge in place. Recheck the bridge after adjusting tension.
Compare the Checks Before Adjusting
Use the hand feel, dial readings, tapping, and bridge position together rather than treating one sign as decisive. A head that yields slightly, gives similar readings around its edge, and supports a bridge on a flat-looking surface shows consistent clues. Also note the hook count: a banjo head is typically held by 16-24 brackets or J-hooks, which affects how nut feel compares across instruments.
Recommended banjo head tension
Choose head tension by balancing its pitch with the tone you want. Treat the recommended pitch as a limit, not a reason to keep tightening.
Set a Target for the Head
For a frosted-top head, use a pitch between G and G# as a practical target. Deering recommends this range and advises against tightening beyond A. Make small, even passes, then listen before deciding whether to adjust again. Consider the banjo’s response as well as its pitch.
Plan Tightening for a New Head
Let a newly installed head settle for a day or two before retightening. Afterward, make one or two follow-up adjustments if needed, turning each hook nut about one eighth of a turn at a time. When tightening a new banjo head, allow for that initial settling period and avoid forcing it to its final tension immediately after installation.
Listen for changes in tone as tension increases. A tighter head generally sounds brighter, while a looser one sounds warmer, less bright, or plunkier. Use these differences to choose a useful target rather than pursuing the highest possible pitch. Lower tension may suit you if you prefer a warmer response. Keep the pitch below A, even if you want a bright sound.
Prepare Safe Tightening Tools
Choose a wrench that fits the banjo’s bracket nuts before turning any hooks. A Goodtime banjo or Boston banjo uses a 9/32-inch T-wrench; a Deering resonator banjo uses a ¼-inch T-wrench; an openback Deering uses a 5/16-inch T-wrench. What tools are needed to tighten a banjo head safely? Use the correctly sized wrench, or a three-way banjo head wrench that fits 1/4, 5/16, and 9/32-inch nuts.
Use pitch as a guide, not a replacement for listening. A head tightened to A is described as rock hard to the touch, with a very bright sound, clear note distinction, and less bass response. This illustrates the trade-off: more tension can sharpen the banjo’s attack while reducing warmth. Stop before A instead of tightening further to chase brightness.
Reassess the sound after every adjustment and keep your preferred tone in mind. A player seeking a rounded, warm sound may choose less tension than someone who wants a bright, sharply defined response. The G-to-G# target offers a reference for frosted-top heads, while the A limit helps prevent over-tightening. Combine the pitch guide with careful listening rather than treating one tone as right for every banjo.
Tightening sequence around the hooks
Work around the rim in a balanced pattern to raise tension evenly. A consistent banjo head tightening sequence helps prevent one area from being pulled down ahead of the rest.
Locate the hook at 12 o’clock and use it as your starting point. Move to the hook directly opposite, at 6 o’clock, then continue by alternating clockwise and counterclockwise. This across-the-head approach spreads each adjustment instead of tightening neighboring hooks in a row. Keep track of your starting hook so each pass follows the same route.
Follow the same route around the rim on every pass. After the 12 and 6 o’clock hooks, work to corresponding positions on opposite sides, alternating clockwise and counterclockwise. The aim is a staggered pattern, not a full turn around one side followed by the other. This keeps pressure more evenly distributed as the head settles onto the tone ring.
For a new head, start at the neck and move around the rim in a staggered pattern. Tighten each nut gradually so the head pulls down evenly around the tone ring. Don’t fully tighten one hook before moving to the next. This gradual sequence helps prevent one edge from descending ahead of the rest.
Use a crisscross pattern if it’s easier to keep opposite hooks paired. Tighten one hook, move across the head to its counterpart, then shift to a different pair. This follows the same principle as moving between 12 and 6 o’clock: distribute the work across the rim. Keep your pattern consistent rather than making isolated adjustments wherever a nut feels loose.
Make each pass a small, controlled adjustment. One cautious approach is to tighten each nut by a small, even amount on each pass. Apply that increment evenly around the rim, then return to the starting point for another pass only after completing the circuit. Don’t turn a single nut much farther than its neighbors.
Pause after each full circuit and inspect how the head sits around the tone ring. Look for an even edge, not a section that appears lower than the rest. If an area seems uneven, keep the next pass balanced across opposing hooks instead of making a large turn on one nut.
Keep a simple record of your starting position and completed passes. For example, note that you began at 12 o’clock and finished one full staggered round. That makes it easier to repeat the same route and spot a skipped hook. A steady pattern matters more than speed; the goal is even tension around every bracket.
Avoiding head damage
Overtightening can split a banjo head, so make each adjustment small. Use measured passes and stop when the head reaches your chosen response.
Turn each hook nut a small amount, then move to the next. Gradual, even adjustments avoid loading one section while the rest remains loose. If one nut has moved noticeably farther than its neighbors, don’t force it further to match a sound. Reassess the whole head before making another pass.
Keep each pass consistent around the rim. Small increments across all hooks distribute tension more evenly than fully tightening one hook at a time. To reduce tension, loosen each hook by one-eighth of a turn at a time. Don’t use a large turn on one nut to correct a local change.
Pause between adjustments and listen before continuing. Retune the instrument after each round, then judge whether its tone and response are moving toward your intended result. If the sound is already bright enough, stop. Extra tension is not worth risking a split head for a tone you don’t want.
Respect the pitch limit if you use a tapped note as your guide. Deering advises against tightening a banjo head beyond A. If the tapped pitch approaches that point, don’t add tension to chase more brightness. A head at A is described as rock hard to the touch, with less bass response.
Let a replacement head settle before tightening it again. Wait a day or two after installation, then retighten gradually as needed. A new head may take a few months to settle in, so don’t treat its first adjustment as final. Small follow-up changes are safer than forcing the head down immediately.
Stop and reassess if the head shows damage or no longer responds evenly. Continuing to turn the hooks can worsen a split, and extra force won’t repair it. Compare tension around the rim and make only controlled adjustments. Once the head reaches your target, leave the hooks alone rather than adding a final turn.
Record each adjustment, including its direction and amount. For example, note one-eighth turns and whether you tightened or loosened the hooks. A record helps you avoid repeating a full adjustment unnecessarily. After a small change, let the banjo rest for a day and play it before deciding whether another pass is needed.
How much should each banjo tension hook be tightened at a time?
Use small, equal adjustments across all hooks, then assess the result before another pass. The practical starting increment is 1/8 turn per hook.
Start with 1/8 turn on each hook nut. Make the same adjustment around the entire rim, rather than tightening one hook substantially before moving on. This gives the banjo head a gradual change across its surface. If the head already feels close to your target, use the smaller 1/16-turn increment instead.
Choose between 1/8 and 1/16 turn according to how much change you need. A 1/8 turn is the standard small adjustment; a 1/16 turn offers finer control when the head is near its desired tension. Keep the increment consistent for each hook during that pass, so one section doesn’t receive a larger change.
Complete a full round before judging the adjustment. Once every hook has received the same increment, retune the banjo and check the head tension again. Retuning matters because a change in tension can affect the instrument’s sound. Assess the result after the full round instead of reacting to the first hook and changing your plan halfway through.
Use the same measured increments when loosening the head. Back each hook off by one-eighth of a turn at a time, keeping the change balanced around the rim. Don’t loosen one nut much farther than the others to create a warmer sound. An even reduction makes it easier to compare the result after retuning.
After a small adjustment, pause before deciding whether another round is needed. One suggested approach is to leave the banjo alone for a day, then play it and assess the sound. This gives the head time to respond to the change. Note the increment you used, such as 1/16 or 1/8 turn, for a consistent next check.
For a new head, retighten each hook by about one-eighth of a turn at a time. Keep the adjustment even, then reassess after the full round instead of forcing the head into position with larger turns. If you’re setting up a banjo and want to explore instruments, browse banjos as you consider the feel and tone you prefer.
Treat the end of a tightening pass as a checkpoint, not a cue to continue immediately. After each round, retune the banjo and check whether the desired tension has been reached. Follow the same routine each time: finish the round, retune, then assess the result before deciding on another adjustment. This keeps your judgment based on a complete pass.
A later listening check gives you another chance to assess the result. One contributor recommends leaving the banjo alone for a day, then playing it to assess the sound. When you return to it, consider whether the sound suits your preference and weigh that judgment alongside the tension check. Don’t rely on your first impression alone. If more adjustment seems necessary, make another measured round and review the result afterward. Keeping the tension check and listening assessment as separate steps makes it easier to decide whether the setup works for you.
Acoustic Vibes Music: Banjos
Acoustic Vibes Music offers banjos for players exploring the instrument’s distinctive tone and feel. Once you understand how head tension shapes a banjo’s response, choosing an instrument becomes a more informed decision: you can consider the sound you enjoy and the playing experience you want. If you’re comparing banjos or thinking about adding one to your collection, Acoustic Vibes Music is a natural next step. Explore the banjo selection and consider how each instrument suits your musical interests. A banjo purchase is a personal choice, shaped by the sound and character that appeal to you. Contact Acoustic Vibes Music to discuss banjos.
Keep refining your banjo’s voice
Use each adjustment to learn what you enjoy in your banjo’s sound. As you play, notice how its response suits your touch, repertoire, and preferred musical character. A measured banjo head tightening sequence gives you a controlled starting point, while your own listening helps shape a setup that feels personal. Be patient and treat the instrument’s response as part of the process.
If the head is damaged or the setup remains difficult to assess, Acoustic Vibes Music’s luthier repair services can help with stringed-instrument care. Professional repair is a useful next step when further adjustment isn’t the answer.
What is the correct sequence for tightening banjo head tension hooks?
Start at the hook at 12 o’clock, then move to the opposite hook at 6 o’clock. Continue around the rim, alternating clockwise and counterclockwise so each adjustment has a counterpart across the head. Keep the same route for each pass. For example, complete the full circuit before returning to the starting hook, rather than tightening several neighboring hooks in succession.
Should banjo head hooks be tightened in a star or alternating pattern?
Use an alternating, crisscross pattern that moves between opposing hooks. “Star” can describe a similar approach, but the essential point is to spread adjustments across the rim instead of working around one side consecutively. For example, pair the 12 o’clock hook with 6 o’clock, then continue with opposing positions. This sequence distributes the work more evenly as the head settles.
What are the risks of overtightening a banjo head?
Overtightening can split the head, so stop rather than applying more force to chase a brighter tone. A head at pitch A is described as rock hard to the touch, producing a very bright sound with clear note distinction but less bass response. If you prefer a warmer tone, extra tension may move the sound away from your goal without improving the setup.
How do you know when a banjo head is too loose or too tight?
A bridge sitting in a valley suggests the head may need tightening, unless you prefer a very warm sound. A looser head produces a warmer, less bright or plunkier tone, but it should remain firm enough to hold the bridge in place. At the other extreme, a head approaching pitch A is described as rock hard. Consider both the bridge position and tone, not just how the nuts feel.
Sign up for our newsletter
Sign up for our mailing list to receive new product alerts, special offers, and coupon codes.