How to Adjust Banjo Bridge Height, Action, and Placement
The bridge’s correct position is the one that keeps the banjo in tune up the neck, not simply the one that looks centered. Start by matching the distance from the nut to the 12th fret with the distance from the 12th fret to the bridge, then compare the fretted 12th-fret note with its harmonic. These professional banjo setup tips will help you make small placement corrections and balance the rest of the setup around the sound and feel you want.
It’s easy to assume that one bridge height or head tension will suit every player, but your touch, preferred tone, and banjo all affect what feels right. These professional banjo setup tips cover checking bridge placement, adjusting head tension and string action, and choosing a head that fits your instrument. You’ll also learn how setup choices affect tone and playability, so you can make deliberate adjustments instead of chasing a single “perfect” measurement.
Key Takeaways
Check bridge placement by comparing the distance from the nut to the 12th fret with the distance from the 12th fret to the bridge.
Use a tap test to assess head tension, and make small, even adjustments rather than tightening one area too far.
Set string action to balance comfortable fretting with clear notes, then listen for buzzing as you play across the neck.
Choose a banjo head crown that suits your instrument, and consider how head tension and string gauge shape tone and feel.
Treat setup measurements as starting points: fine-tune bridge height and head tension to suit your playing style and preferred sound.
Head tension affects a banjo’s response and tone. Adjust it evenly in small steps, listening and checking the tuning after each change before deciding whether to continue.
Check Head Tension with Tap Testing
Tap the head lightly around its edge and listen for a consistent pitch. A commonly cited target for most bluegrass-style banjos is approximately 85-95 Hz; tap tuning can also land between G and B, depending on the tone you want. Listen for uneven, noticeably different pitches around the rim. A DrumDial offers another way to compare tension at repeated points, but consistency around the head matters more than chasing an isolated reading.
Make Even Head-Tension Adjustments
Use a suitable wrench to turn each tension-hook nut in a balanced pattern around the rim. Make small adjustments, then tap-test the head again rather than tightening one area heavily. This keeps tension more even and helps you hear how each change affects the head’s response. Don’t force a resistant nut; stop if a hook or nut appears damaged. After each pass, recheck the full circle, not just the area you adjusted.
Check Tension and Tuning
Retune the strings after changing head tension, then listen again to the head and instrument. A change in tension can alter the banjo’s response, so judge the sound with the strings at pitch. If the head was very loose for a long time, give it 24 hours to settle before rechecking. Banjo heads generally need adjustment a few times a year, particularly when humidity changes.
Gather a tuner, a suitable wrench, and a DrumDial if you want to compare measured readings. Use the wrench for even hook adjustments, the tuner to restore string pitch, and the DrumDial to compare readings around the head. Tap testing requires no measuring device, but use the same light tap at each spot. Record your preferred readings or tap pitch to give future checks a useful reference.
Check neck relief separately from head tension. Fret a string at the 1st and 22nd frets, then compare the 7th-fret clearance with a straight line between them. Recommended neck bow is between 1/64 inch and 1/32 inch. If relief needs correction, use the truss rod carefully; adjustment rarely requires more than a single turn of the nut driver. Don’t use head tension to compensate for neck relief.
Finish with another pass around the head and a fresh tuning check. If you’ve tightened a chronically loose head, wait the full 24 hours before judging its settled pitch. During seasonal changes, repeat your inspection and make only the adjustment needed to restore an even tap tone and your preferred response. Small, repeatable changes make it easier to identify which adjustment improved the banjo.
Bridge height and string action
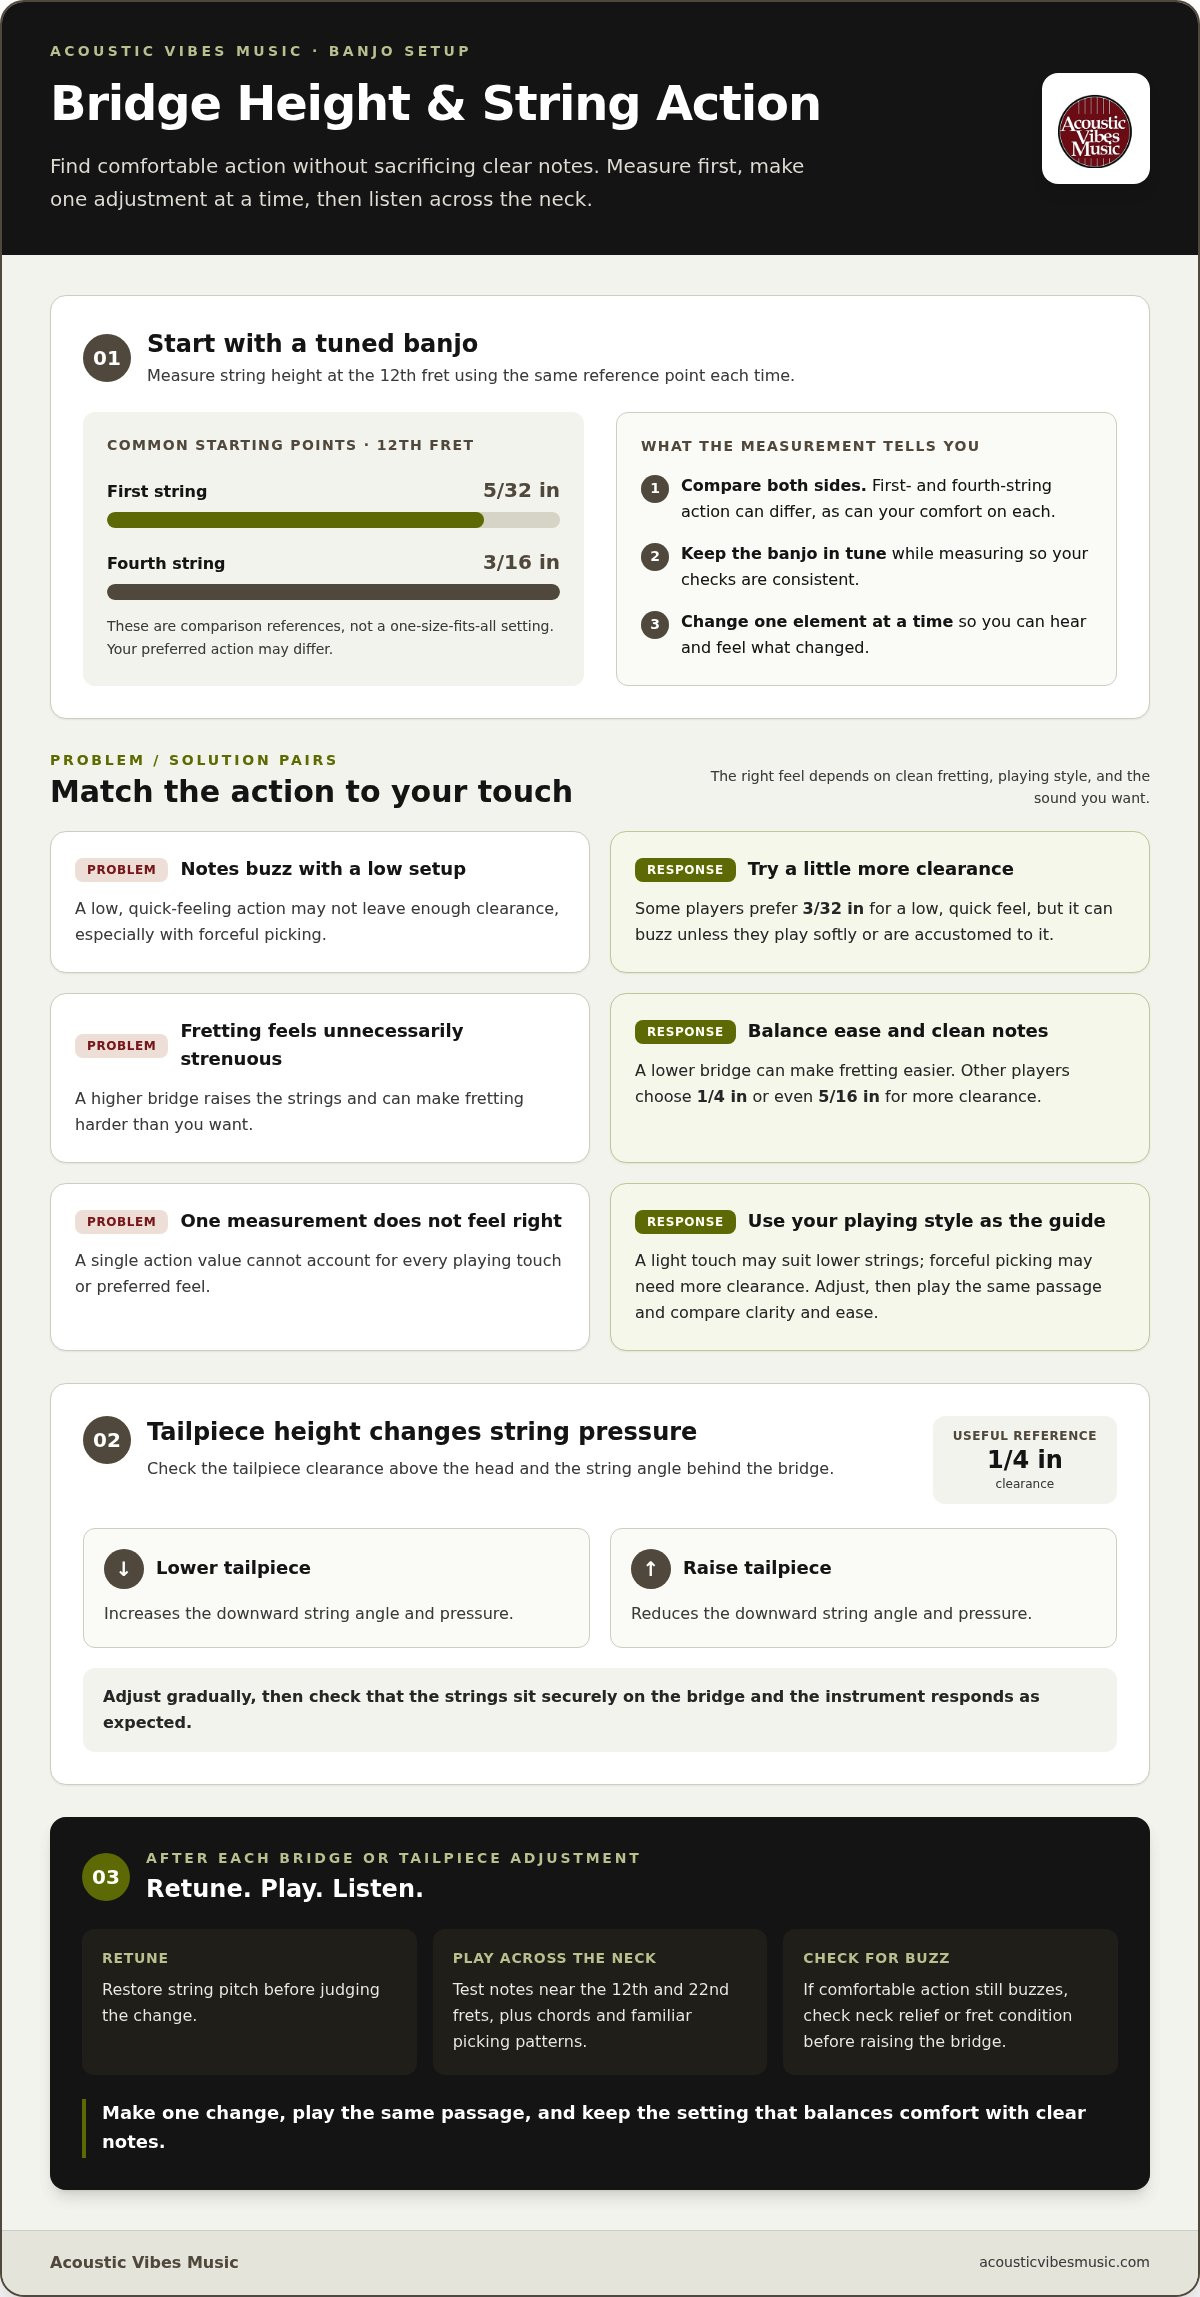
Bridge height sets string action, but the right feel depends on clean fretting and your playing touch. Measure the action first, then change one element at a time.
Measure the string height before choosing a different bridge. At the 12th fret, a common starting point is about 5/32 inch under the first string and 3/16 inch under the fourth. Those measurements help you compare the treble and bass sides, but your preferred action may differ. Keep the banjo tuned while measuring, and use the same reference point each time.
Compare the action near the neck’s upper frets, where low strings may buzz during hard playing. Check string height above the upper frets, keeping in mind that preferred clearance varies with playing style. Some players prefer 3/32 inch for a low, quick feel, but that can buzz unless they play softly or are accustomed to it. Others choose 1/4 inch or even 5/16 inch for more clearance.
Choose a bridge height that gives you the action you want while keeping the banjo playable across the fretboard. A lower bridge can make fretting feel easier; a higher bridge raises the strings and can provide more clearance. After changing the bridge, retune and play notes across the neck. Listen for buzzing, then test chords and familiar picking patterns before deciding whether the adjustment works.
Set the action for your playing style, not just a single measurement. A light touch may suit lower strings, while forceful picking may need more clearance to keep notes from rattling against the frets. Compare the first and fourth strings separately, since their action and your comfort can differ. Make one change, play the same passage, and note whether clarity or ease improved.
Set tailpiece height by checking its clearance above the head and the string angle behind the bridge. About 1/4 inch of clearance is a useful reference; lowering the tailpiece increases the downward angle and pressure, while raising it reduces them. Adjust gradually, then check that strings sit securely on the bridge and the instrument responds as expected.
Retest after every bridge or tailpiece adjustment. Tune the strings, fret notes near the 12th and 22nd frets, and listen for buzz or muted response. If the action feels comfortable but notes still buzz, check whether the neck relief or fret condition is contributing. Avoid compensating for every problem by raising the bridge, because that can make fretting unnecessarily strenuous.
Bridge placement correct?
Bridge position affects intonation across the neck. Start with the 12th-fret midpoint, then test fretted notes against their harmonics.
Align the Bridge Position
Place the bridge so the distance from the nut to the 12th fret matches the distance from the 12th fret to the bridge. On a standard five-string banjo, the scale length is typically 26-5/16 inches, and the recommended distance from the center of the 12th fret to the bridge center is 13 3/16 inches. Treat these as starting references, then test intonation.
Check Intonation After Bridge Placement
Tune each string, sound its 12th-fret harmonic, then fret the same string at the 12th fret. Compare the pitches with a tuner. If the fretted note differs from its harmonic, move the bridge a few millimeters toward or away from the tailpiece, then repeat the test. A sharp fretted note calls for a longer string length; a flat note calls for a shorter one.
Keep the bridge straight across the head when testing notes. Its feet should sit flat, and the bridge should run perpendicular to the strings, not lean toward the neck or tailpiece. Sight along it from above: an angled bridge can distort the string paths and complicate intonation checks. If one side appears ahead of the other, realign the bridge before moving it lengthwise.
Make small, controlled movements during each intonation adjustment. Loosen string pressure slightly if the bridge resists movement, shift it only a few millimeters, then bring the strings back to pitch. Retest the 12th-fret harmonic and fretted note after each move. Avoid dragging the bridge under full string tension, which can tilt it or pull it out of alignment.
Check more than one string before settling on the final position. Compare the first and fourth strings at the 12th fret, since a bridge angle can help one string while leaving another out. If the readings disagree, adjust the bridge angle slightly and repeat both comparisons. Keep changes incremental, and retune between tests so pitch differences reflect placement rather than slack.
Test the fifth string separately after positioning the main bridge. Its intonation is set at the fifth-fret pip or capo, so moving the bridge won’t correct every fifth-string pitch issue. Tune the open fifth string, then compare its fretted notes with the expected pitches. Before moving the bridge again, check that the pip or capo holds the string cleanly.
Finish by playing a familiar passage across open strings and fretted notes. A well-positioned bridge should keep the 12th-fret comparisons close while preserving clear chords up the neck. Recheck the bridge’s alignment after tuning, especially if strings were recently changed. Record its final position relative to the 12th fret for a useful reference at the next setup.
Choosing a banjo head
Choose a head crown that fits your banjo, then adjust the strings and bridge height to suit your touch. Light strings put less tension on the neck than medium strings, while bridge height determines string action.
Compare Banjo Head Types
Check your banjo’s model specifications to identify the intended head crown before buying a replacement. High- and medium-crown heads sit differently against the rim, so the wrong fit can complicate installation and setup. Match the crown to the instrument rather than choosing by tone alone. Once the head is fitted, bring its tension up evenly and assess the sound before making further adjustments.
Match Head Choice with Strings and Bridge Height
Choose string gauge and bridge height as parts of the same setup, not isolated upgrades. Five-string sets commonly include light gauges from .009 to .020, medium-light gauges from .010 to .022, and medium gauges from .011 to .022. Light-gauge strings put less tension on the neck than medium-gauge strings. A 5/8-inch bridge is a common starting point for many Mastertone-style banjos, but action and playing feel guide the final choice.
Start by identifying the head crown, then note which strings and bridge are already on the banjo. If the maker specifies a crown, use that as your fit reference. A head that doesn’t sit correctly on the rim can prevent an even setup. Don’t try to compensate for a poor fit by changing string gauge or raising the bridge: those choices affect feel, not crown compatibility.
Consider what you want from the strings. Light gauges can suit a player seeking lower neck tension, while medium gauges create a different feel under the fingers. Compare the gauges in the set, not just the first string. For example, a light set runs .009 to .020, while a medium set runs .011 to .022. Keep your preferred picking touch in mind.
Use bridge height to refine string action after settling on the head and strings. Bridge options include 1/2-inch and 3/4-inch heights, alongside the 5/8-inch starting point. A taller bridge raises the strings; a shorter bridge lowers them. After any change, tune the banjo and test notes across the fretboard for comfortable fretting and clear sound.
After setup, assess how the head, bridge, and tailpiece work together. The tailpiece affects the strings’ downward angle over the bridge, while head tension changes the instrument’s response. Adjust one thing at a time, retune, and play the same passage to compare. This makes it easier to tell whether a change in tone or feel came from the head, strings, or bridge.
Personal preferences for banjo setup
Let your preferred tone and playing touch guide final adjustments rather than relying on a universal setting. To protect playability, don’t force a truss-rod nut or overtighten head hardware. Make small changes and reassess the banjo.
Choose a head pitch by ear, then compare the result with your playing goals. Some players prefer approximately G#, while others tune the head to A, Bb, F#, or F. Each choice shapes response and tone, so tap-test after every adjustment and play a familiar passage. Consider clarity and volume together instead of chasing pitch alone.
Set head tension to suit the sound you want. On a scale from one to ten, seven or eight can produce a plunkier, tubbier tone, while nine or ten can sound more piercing and stiff. Treat these ratings as preference points, not fixed rules. Adjust gradually, then listen to the banjo with both light picking and a stronger attack.
Match string gauge to your touch and how the neck feels under your fingers. Light-gauge strings put less tension on the neck than medium-gauge strings, which can affect playability. If medium strings feel resistant, try a light set and compare the response. Keep the tuning and picking pattern the same so the difference is easier to hear.
Choose action for the way you play. Action close to 3/32 inch above the 22nd fret can suit some players, but may buzz with a stronger touch. Other players prefer 1/4 inch or 5/16 inch for greater clearance. Test familiar passages at your usual volume, then balance easy fretting against clean notes.
Protect the setup by treating coordinator rods and the truss rod as separate adjustments. Limit coordinator-rod changes to an eighth turn, and avoid using the rods to correct every action issue. For neck relief, check the bow first; the recommended range is between 1/64 inch and 1/32 inch. Stop if a nut resists rather than forcing it.
Change one variable at a time and record the result. Note the head pitch, string gauge, bridge height, and action that suit your playing. If buzz, tuning instability, or uncomfortable fretting appears after an adjustment, return to the last workable setting before changing another component. Explore banjos suited to your playing style as you refine your preferences.
Acoustic Vibes Music: Acoustic Guitars
Acoustic Vibes Music offers banjos alongside acoustic guitars, classical and flamenco guitars, and mandolins. If your setup experiments have clarified the tone and feel you prefer, use that insight to guide your next instrument choice. Comparing instruments can help you notice differences in response, sound, and comfort, whether you’re choosing a banjo or adding another acoustic instrument to your collection. Explore the selection at acousticvibesmusic.com or contact Acoustic Vibes Music for help finding an instrument that suits the music you want to play.
Make Your Setup the Starting Point
Let your banjo’s response guide each adjustment. Setup isn’t simply a set of measurements; it’s a way to bring the instrument closer to your touch, tone, and musical goals. Note what feels comfortable and sounds clear so future changes build on your experience. These professional banjo setup tips can help you make informed choices, but persistent buzzing, tuning trouble, or a difficult adjustment may need an experienced eye.
Acoustic Vibes Music offers banjos and luthier repair services for players who want support with their instrument. Whether you’re refining a familiar banjo or exploring a different acoustic sound, let your preferences lead the way. Contact Acoustic Vibes Music for setup help and take your next step toward a banjo that feels more personal under your hands.
Frequently Asked Questions
Head tight enough?
Your banjo head is tight enough when its tension is even and the tone suits your playing. For most bluegrass-style banjos, a commonly cited target is approximately 85-95 Hz, while tap tuning may land between G and B. Compare taps around the head, or use a DrumDial to check for uneven readings. A single spot that sounds or measures different can point to inconsistent tension.
How Should I Get My Banjo Set Up?
Follow a consistent order: tune the banjo, inspect the hardware, then assess how it plays. Use a familiar tune to reveal buzzing, uncomfortable fretting, or notes that sound out of tune higher up the neck. Make one adjustment at a time and record the result. This gives you a clear comparison and makes it easier to return to an earlier setting if a change doesn’t help.
Neck tight to the rim?
The neck should attach securely to the rim, with no movement at the joint. Gently check for looseness, then inspect the coordinator rods and their nuts. A banjo’s two rim rods should be snug at the neck end before you adjust them at the opposite end. Don’t force a resistant nut: damaged threads or hardware can turn a small setup task into a more complex repair.
What are the key steps for a professional banjo setup?
Move from basic condition checks to fine adjustments: inspect the neck and hardware, assess the head, then test bridge position, action, tuning, and playability. These professional banjo setup tips work best when you evaluate the instrument as a system. For example, don’t change bridge height to mask a neck-relief issue. Retune after adjustments, play across the neck, and note which change improves the sound or feel.
What is the ideal banjo action height and how is it measured?
Action depends on your touch, but a useful reference is about 1/8 inch above the 12th fret. Measure from the fret top to the underside of the string, with the banjo tuned. Check both outer strings: a common starting point is 5/32 inch at the first string and 3/16 inch at the fourth. Compare comfort and note clarity rather than treating one measurement as ideal for every player.
How do you adjust banjo bridge placement and intonation?
Start by matching the nut-to-12th-fret distance with the 12th-fret-to-bridge distance. Tune the string, compare its fretted 12th-fret note with the harmonic, and move the bridge a few millimeters if they differ. Retune and repeat the comparison after each move. Check more than one string, since bridge angle can affect them differently. The fifth string’s intonation is adjusted separately at its fifth-fret pip or capo.
When should a banjo setup be done by a qualified repair technician?
Choose a qualified repair technician if adjustments don’t resolve persistent buzzing, tuning problems, or uncomfortable playability. Seek hands-on help if the truss rod or coordinator-rod hardware resists movement, the neck joint feels loose, or a part appears damaged. These symptoms can involve more than routine setup. Acoustic Vibes Music provides luthier repair services for stringed instruments, including banjos, when careful evaluation or repair is needed.
How much does professional banjo setup cost in the United States?
Sign up for our newsletter
Sign up for our mailing list to receive new product alerts, special offers, and coupon codes.