My shopping cart
Your cart is currently empty.
Continue ShoppingA world-class instrument is only as good as the physics behind its assembly. You might own a stunning pre-war style flathead, but without a precise banjo setup for bluegrass, you're likely fighting a muddy tone and inconsistent volume across the fretboard. It's frustrating when your rolls feel sluggish or your high notes lack that signature dry crack that cuts through a crowded jam. We understand that pursuit of tonal excellence because we share your deep reverence for the craft and construction of these magnificent machines.
This guide promises to demystify the complex mechanics of your instrument, offering the professional secrets needed to achieve bright projection and effortless playability. You'll discover how to calibrate head tension to that sweet-spot G# frequency and why an 11/16" bridge height might be the key to unlocking your banjo's hidden power. We'll walk through a systematic approach to luthier-grade adjustments, from truss rod relief to tailpiece elevation. By the end, you'll have the knowledge to maintain your instrument as a high-performance bluegrass machine that responds to every subtle touch of the picks.
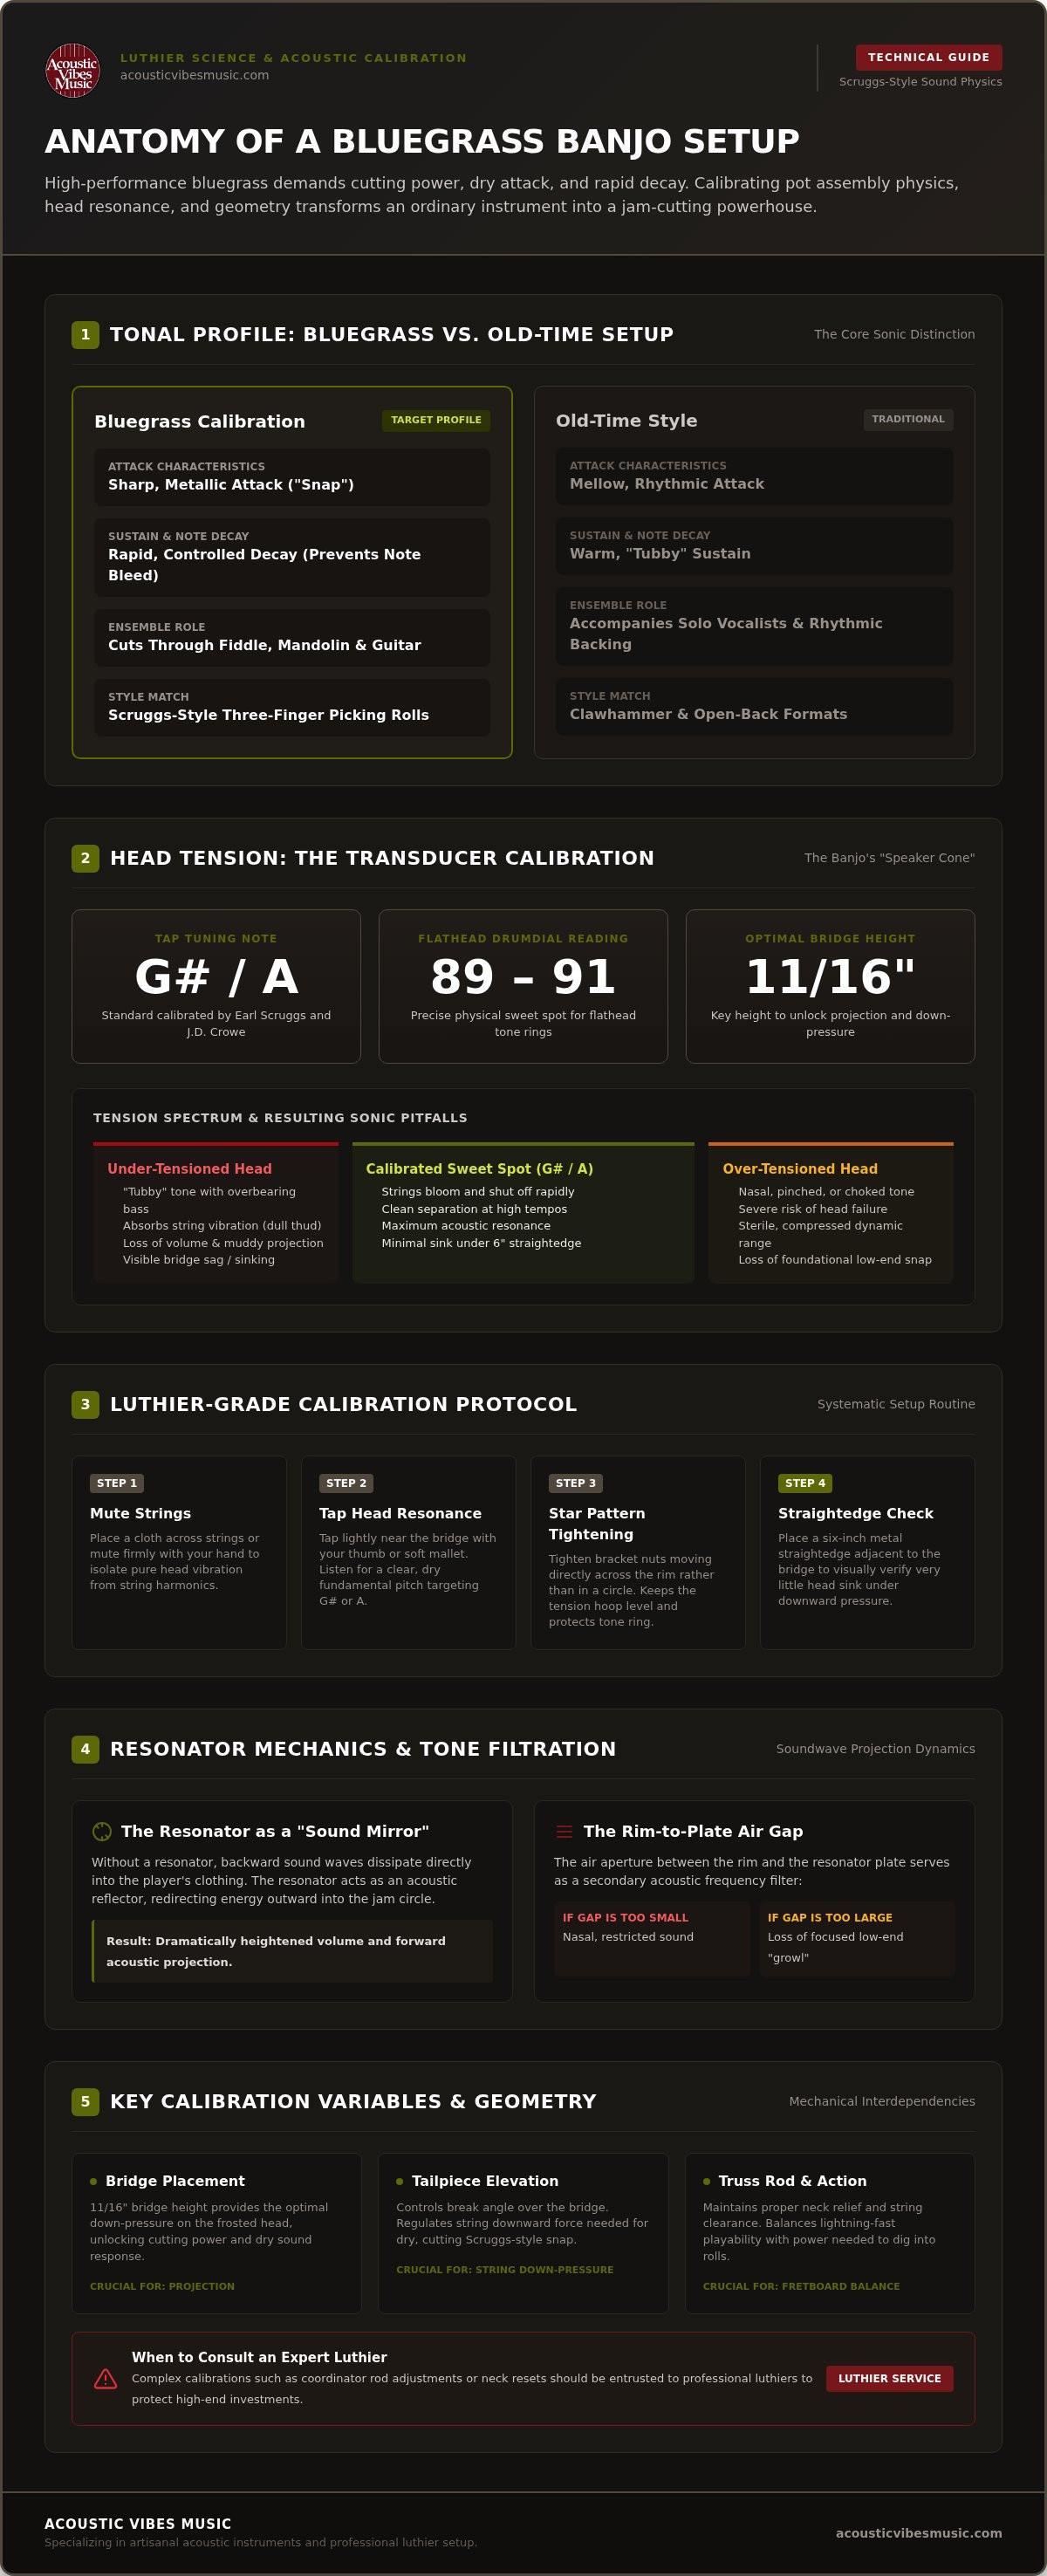
Bluegrass performance demands a specific sonic profile: a sharp, metallic attack followed by a rapid, controlled decay. Achieving this requires a meticulous banjo setup for bluegrass that differs fundamentally from the mellow, rhythmic requirements of old-time styles. While a clawhammer player might seek a warm, "tubby" sustain to accompany a solo singer, a bluegrass picker needs an instrument that can slice through a dense ensemble of fiddle, mandolin, and guitar. This signature "snap" is the hallmark of the genre, providing the drive and energy necessary for high-speed rolls.
The resonator plays a vital role in this equation. It acts as a sound mirror, reflecting waves forward toward the audience rather than letting them dissipate against the player's clothing. Exceptional instruments from builders like Collings require this high-tension calibration to truly bloom. Without the correct balance of tension and geometry, even the finest artisanal banjo will sound choked or muddy, failing to deliver the professional projection you expect from a premium build.
The "snap" is that immediate, percussive pop heard during rapid Scruggs-style three-finger picking rolls. This isn't just about playing technique; it's a result of high string tension interacting with a precisely tightened frosted plastic head. A loose head absorbs vibration, creating a dull thud. Conversely, a head tuned to the correct frequency allows the strings to bloom and then shut off quickly, preventing notes from bleeding into each other during fast passages. Mastering your banjo setup for bluegrass ensures that every note remains distinct and clear, even at blistering tempos. "Tubby" tones are the primary enemy of a clean roll, as they mask the intricate fingerwork that defines the genre's artistry.
The resonator demands a tighter, more aggressive setup compared to its open-back counterparts. Because the sound is trapped and then reflected, the internal physics of the pot assembly are under much higher scrutiny. The air gap between the rim and the resonator plate acts as a secondary filter for your tone. If this gap is too small, the banjo can sound nasal and restricted. If it's too large, you lose the focused low-end response that provides the instrument's "growl." High-end professional setups focus on finding the exact equilibrium where the resonator enhances the natural resonance of the rim without introducing unwanted overtones. Ultimately, a bluegrass setup is the calibration of head tension and bridge height for maximum clarity.
The frosted top head is the primary transducer of your instrument. It functions as the "speaker" that translates string vibration into audible sound. In a proper banjo setup for bluegrass, head tension dictates the entire frequency response and dynamic range. An under-tensioned head results in a "tubby" sound characterized by overbearing, muddy bass and a noticeable lack of volume. Conversely, chasing the elusive G# note too aggressively carries the risk of head failure or a choked, nasal tone. Understanding the acoustic physics of banjo head tap-tuning is essential for any serious picker looking to maximize their instrument's potential. Professional luthiers often rely on the tactile feedback of a bracket key, though modern tools like a DrumDial provide a measurable sweet spot, typically between 89 and 91 for flathead tone rings.
To find the head's natural resonance, you must first mute the strings with a cloth or your hand. Tap the head lightly near the bridge with your thumb or a soft mallet. You're listening for a clear, dry note. Most bluegrass professionals target a G# or A frequency. This specific pitch matches the resonant standard established by legends like Earl Scruggs and J.D. Crowe. When adjusting, use a star pattern to tighten the bracket nuts. Move across the rim rather than in a circle. This ensures the tension hoop remains level, preventing uneven pressure that can warp the rim or tone ring. If you find the process daunting, our professional luthier services can help you find that perfect equilibrium.
Science meets intuition when checking your setup. A properly tensioned head should show very little "sink" under the bridge. Place a six-inch metal straightedge across the head next to the bridge. A standard US dime should just barely slide beneath it. If the bridge is dipping significantly, your tension is too low, sacrificing clarity for a darker tone. Over time, Mylar heads lose their elasticity. If you notice a persistent dullness despite correct tension readings, it's time for a replacement. A fresh frosted head restores that crystalline high-end "zing" that defines a high-performance bluegrass machine. Inspect the head surface for any signs of stretching or thinning near the tension hoop, as these are precursors to a sudden pop during a performance.
The bridge serves as the critical filter through which every vibration must pass before reaching the pot assembly. In a high-performance banjo setup for bluegrass, selecting a bridge made of dense maple with a hard ebony top is essential for that classic, biting attack. This combination ensures that the high-frequency energy isn't absorbed by softer woods, maintaining the clarity needed for complex roll patterns. Historically, the development of the modern resonator banjo focused on maximizing this acoustic output through superior material choices and structural rigidity. When these components are aligned, the instrument gains a three-dimensional quality that cuts through any mix.
Precision is paramount. Start by measuring the distance from the nut to the 12th fret; the bridge should sit at an equal distance from the 12th fret to the tailpiece side of the head. However, true intonation requires fine-tuning. Compare the harmonic at the 12th fret with the fretted note. If the fretted note is sharp, move the bridge toward the tailpiece. If flat, nudge it toward the neck. Even a millimeter of movement changes the "sweet spot" for 1st and 5th string clarity. For enthusiasts expanding their bluegrass toolkit, mastering these nuances is just as vital as choosing the Best Intermediate Mandolin for ensemble play.
Tailpiece geometry dictates the downward pressure exerted on the bridge, which directly influences volume and sustain. A steeper string angle increases brightness and "snap" but can choke the rim's natural resonance if overdone. Finding the neutral position is key, especially for the Presto-style tailpieces found on many Gibson banjos. Industry standards suggest setting a Presto tailpiece floating parallel or approximately 1/4" to 5/16" off the head tension hoop. This allows the instrument to breathe while maintaining enough tension to drive the bridge. Be mindful that excessive down-pressure also increases string tension, potentially leading to left-hand fatigue during long sets. Achieving a professional banjo setup for bluegrass is about finding the equilibrium where projection meets playability.
Strings are the primary engine of your tone, providing the essential "zing" that defines a high-performance instrument. While nickel-plated steel remains the industry standard for its classic bite and warmth, stainless steel alternatives offer superior corrosion resistance and a brighter attack. In a professional banjo setup for bluegrass, the relationship between string gauge and action height determines how much energy you can transfer into the pot assembly. Most bluegrass pickers prefer a slightly higher action than guitarists, typically targeting 1/8" at the 12th fret. This clearance prevents fret rattle during aggressive thumb attacks and allows the notes to ring with authority. The nut also demands attention; slots must be cut for friction-free tuning to ensure the strings don't bind when you're using a capo on stage.
Choosing the right gauge is a balance between fingerpick clearance and tonal mass. A standard Scruggs-style set often utilizes .010, .011, .012, .020w, and .010. These light-medium gauges provide the necessary flexibility for lightning-fast rolls without sacrificing the "meat" of the note. If you find your tone is too thin, moving to a .011 first string can add significant resistance and a bolder presence. To keep your instrument's response consistent, we recommend regular string changes every 20-30 hours of play to maintain "snap." Old strings lose their elasticity and harmonic clarity, making even the finest Gibson or Collings sound sluggish.
The coordinator rods inside the rim are frequently the victims of well-intentioned but harmful adjustments. You should never use these rods to "force" a neck angle change or lower the action. Their primary purpose is to stabilize the rim and secure the neck heel firmly against the pot. Overtightening these rods to bow the rim out-of-round chokes the natural resonance of the wood and can lead to structural failure. Maintaining rim neutrality is essential for the instrument to breathe and project. If your action requires more than a minor tweak, it's time to book a professional setup with our luthier team to ensure your neck geometry is corrected without compromising the integrity of your rim.
While enthusiast-led maintenance keeps your instrument playable, a comprehensive banjo setup for bluegrass often requires the specialized touch of a master luthier. For high-end instruments like those from Collings or Martin, the stakes are elevated. Forcing adjustments on a boutique rim or a delicate tone ring can lead to irreversible structural damage. A specialist understands the nuances of rim neutrality and neck heel geometry that generic DIY guides simply overlook. Entrusting your instrument to a professional ensures that every component, from the coordinator rods to the nut slots, is harmonized for maximum projection.
Recognizing the boundary between routine maintenance and structural intervention is vital for any serious picker. If you experience persistent string buzzing that survives bridge height and neck relief adjustments, the issue likely resides in uneven fret wear or a shifting neck heel. A "dead" sounding 4th string, even with fresh strings and high head tension, often points to a loss of rim resonance or a poorly fitted tone ring. Additionally, look for visible warping or pulling at the heel where the neck meets the pot assembly. These aren't minor tweaks; they're signals that your instrument requires expert luthier services to restore its crystalline snap and structural integrity.
Think of professional calibration as the ultimate upgrade for your bluegrass machine. An expert setup can transform a modest instrument into a high-performance tool, and it can turn a premium banjo into a resonant masterpiece. This level of care is an essential part of owning a high-end instrument, ensuring your investment retains its value and playability for decades. If you are a collector of other fine stringed instruments, you might find our guide on High End Acoustic Guitars for Sale useful for maintaining an heirloom-quality collection. Our team specializes in the technical nuances that define the bluegrass sound, providing national-level expertise for players who demand the best.
When preparing your banjo for national shipping to our specialist shop, use a high-quality case and ensure the bridge is removed to prevent head damage during transit. We treat every instrument with the reverence it deserves, focusing on the minute details that ensure your rolls are clean and your lead lines cut through the mix. To secure the bright projection and effortless playability your music demands, Contact Acoustic Vibes Music today to schedule your professional bluegrass calibration.
Achieving that elusive crisp snap isn't about luck; it's a result of deliberate, technical calibration. By mastering the relationship between G# head tension and precise tailpiece geometry, you transform your instrument into a high-performance tool ready for any stage. A professional banjo setup for bluegrass ensures that every roll is distinct and every lead line carries the projection needed to cut through the jam. As an authorized dealer for world-renowned boutique brands, we understand the reverence these instruments deserve. Our national shipping specialists ensure high-end goods arrive safely, while our expert luthier services are available by appointment to handle complex adjustments. Whether you're a seasoned collector or a dedicated newcomer, the right configuration is the key to your musical discovery. Explore our curated collection of professional bluegrass banjos and find the perfect partner for your journey. Your pursuit of tonal excellence starts here.
You should check your head tension every three to six months or whenever you notice a significant change in seasonal humidity. Mylar heads gradually stretch under the constant pressure of the strings, which eventually leads to a loss of that signature bright projection. A quick tap tune to G# ensures your banjo setup for bluegrass remains optimized for the stage. Regular maintenance prevents the tone from becoming dull and keeps your rolls sounding crisp and articulate.
While the historical baseline is 5/8", most modern bluegrass professionals prefer an 11/16" bridge height. This additional height increases the string break angle over the bridge, which exerts more downward pressure on the head. This geometry results in higher volume and a punchier attack that cuts through an ensemble. If you're chasing maximum projection, experimenting with a slightly taller bridge made of dense maple and ebony is an excellent way to refine your sound.
A "tubby" or muddy tone is almost always a symptom of insufficient head tension. Even with premium new strings, a loose head acts as a dampener rather than a resonator, absorbing the energy of your picking. You can identify this by looking for excessive bridge depression or a lack of high-end "zing." Tightening the bracket nuts in a systematic star pattern will typically restore the crystalline clarity and rapid decay required for traditional three-finger rolls.
You can certainly use a high-quality chromatic guitar tuner to assist with tap tuning your banjo head. To do this effectively, mute the strings with a cloth and tap the head near the bridge while watching the tuner for a G# or A reading. It requires a very quiet environment and a sensitive microphone to pick up the membrane's resonance. This method provides a reliable numerical baseline for your banjo setup for bluegrass when a dedicated tension gauge isn't available.
A heavier tailpiece often provides more sustain and tonal stability by adding mass to the pot assembly. While the lightweight Presto tailpiece is the standard for a traditional Scruggs sound, adjustable heavier models can help curb unwanted overtones and provide a more focused "growl" on the fourth string. The key is adjusting the height to find the perfect down-pressure. Too much pressure can choke the rim, while too little sacrifices the instrument's natural power.
Minor stability adjustments are safe for most hobbyists, but you must exercise extreme caution. Coordinator rods are designed to secure the neck and maintain rim roundness, not to function as a primary tool for lowering action. Wrenching these rods to force a neck angle change can easily delaminate or crack a high-quality wooden rim. If your action requires a significant shift, we strongly recommend consulting a professional luthier to ensure the structural integrity of your instrument.
The primary difference lies in the balance of brightness versus warmth. A bluegrass setup utilizes a resonator and high head tension to achieve maximum volume and a quick, percussive decay. In contrast, clawhammer setups typically involve open-back banjos with lower head tension and often utilize natural skin or Fiberskyn heads. This creates a mellower, "plunky" tone with more sustain, which complements the rhythmic, down-picking style of old-time music rather than the sharp attack of bluegrass.