My shopping cart
Your cart is currently empty.
Continue ShoppingLowering your strings by simply cranking the truss rod is the quickest way to compromise the geometry of a world-class instrument. If you've noticed your acoustic guitar action too high lately, you're likely enduring hand fatigue during barre chords or sharp intonation at the higher frets. It's a common frustration that can turn a session of musical discovery into a physical chore. We agree that a premium instrument should feel as exquisite as it sounds, and fighting against high tension shouldn't be part of your creative process.
This guide promises to show you how to identify the root cause of high string action and the precise steps to restore your guitar's playability without risking damage. We'll explore the vital difference between a routine setup and a structural repair, examine factory-spec measurements from builders like Martin and Taylor, and pinpoint exactly when to put down the DIY tools. You'll gain the confidence to understand your instrument's health and know when it's time to consult a professional luthier repair service to ensure your guitar remains a masterpiece for generations.
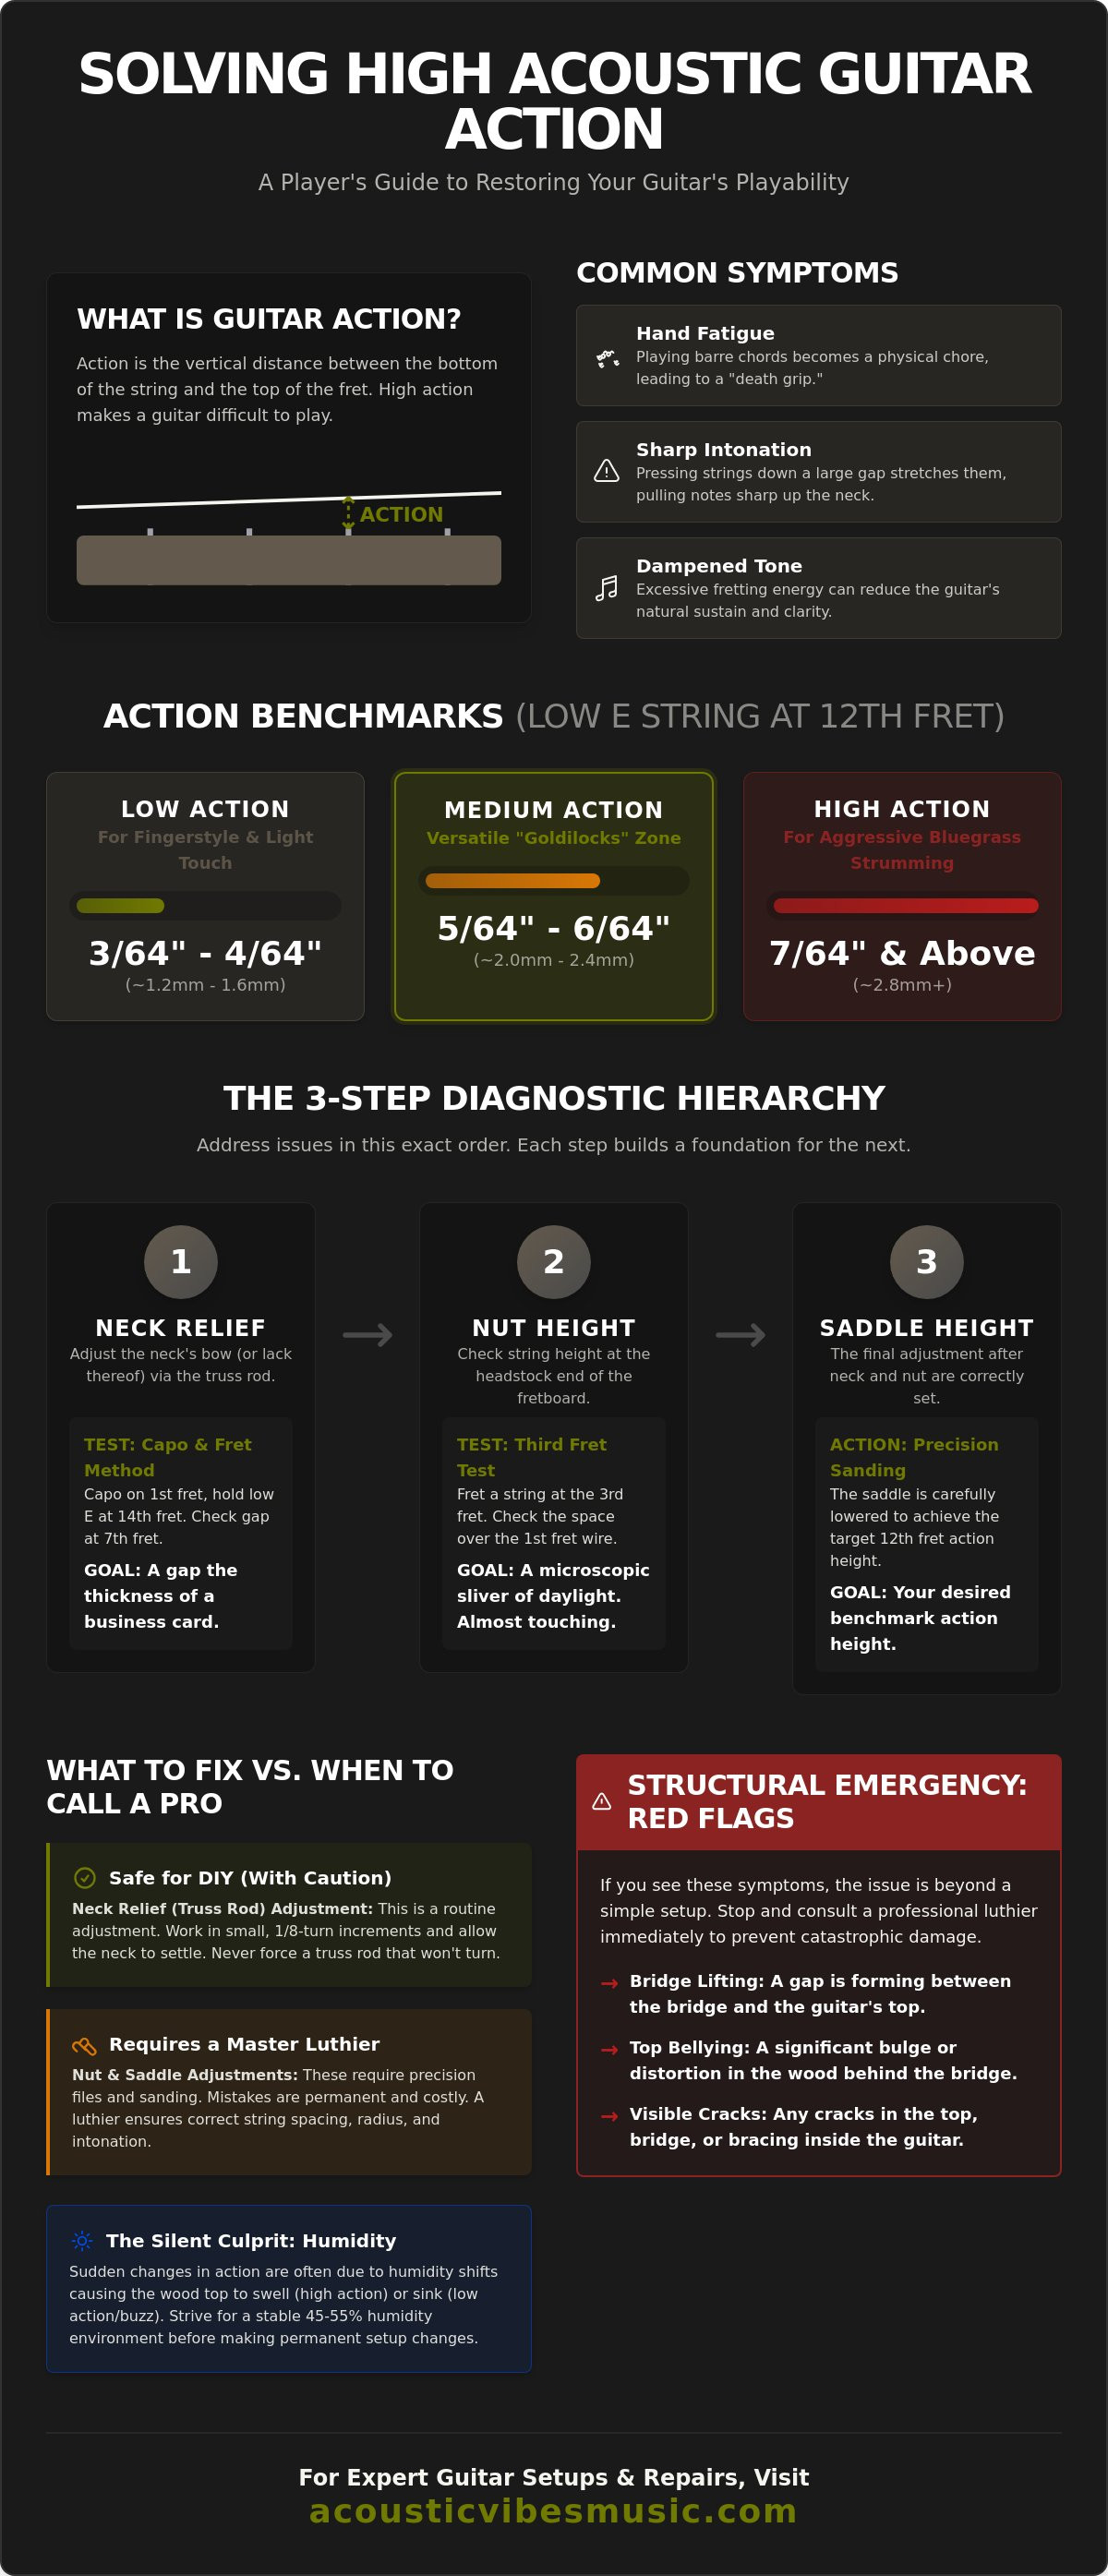
To truly appreciate the artistry of a high-end instrument, one must understand the subtle mechanics that define its soul. What is guitar action? In the simplest terms, it's the vertical distance between the top of the fret wire and the underside of the string. While it sounds like a basic measurement, this gap is the gatekeeper of your entire playing experience. If you feel you're wrestling with your instrument rather than dancing with it, your acoustic guitar action too high might be the culprit. We measure this distance at two critical points: the 1st fret, which dictates the ease of open chords, and the 12th fret, which reveals the overall geometry of the neck.
Precision is the hallmark of artisanal luthiery. For legendary builders like Martin, factory specifications typically land between 2.38 mm (6/64") and 2.78 mm (7/64") for the low E string at the 12th fret. In contrast, Taylor often ships with a slightly leaner 2.0 mm (approx. 5/64") setup. These measurements aren't just arbitrary numbers; they reflect the intended voice of the guitar.
When your strings sit too far from the fretboard, every note becomes a physical struggle. The most immediate casualty is intonation. As you press a string down across a massive gap, you're effectively stretching it. This pulls the note sharp before it even rings out. This "sharpening" effect makes even a perfectly tuned guitar sound sour as you move up the neck. It's a frustrating barrier for those seeking tonal purity.
Beyond the sound, there's a physical toll. Excessive height forces your hand to work overtime. This leads to premature fatigue, cramped muscles, and the development of "death grip" habits that are difficult to unlearn. If you're finding it impossible to ring out a clean barre chord, don't blame your hands. You might simply be dealing with acoustic guitar action too high for your specific technique. A high action also dampens the natural resonance of the instrument. The energy required to fret the note often absorbs the very sustain and clarity you're trying to achieve in the upper register.
Don't reach for the sandpaper just yet. Adjusting an instrument's geometry is a delicate dance of physics and craftsmanship. If you've found your acoustic guitar action too high, you must follow a specific diagnostic hierarchy. Jumping straight to the saddle without checking the neck's curve is a recipe for a permanent, costly mistake. We always address the components in this exact order: neck relief, nut height, and finally, saddle height. This sequence ensures that each adjustment builds upon a stable foundation.
When diagnosing sudden high action, a specialist looks for environmental shifts before picking up a file. A change in one area often cascades into another. By following this hierarchy, you isolate the true culprit rather than chasing symptoms across the fretboard.
Measuring the curve of your neck doesn't require a laboratory. Use the "Capo and Fret" method to turn your strings into a built-in straightedge. Place a capo at the first fret and hold down the low E string where the neck meets the body, usually at the 14th fret. Now, look at the gap between the bottom of the string and the top of the 7th fret. A healthy neck has a slight "relief" or forward bow, roughly the thickness of a business card. If the gap is large enough to fit a heavy pick, you have excessive relief. This bow pulls the strings away from the frets in the middle of the neck, making playability a chore. Conversely, a "dead flat" neck or a "backbow" will cause annoying fret buzz.
Analyzing the extremities of the string path is your next priority. To check the nut, perform the "Third Fret Test." Fret the string at the third fret and observe the space above the first fret wire. There should be a microscopic sliver of daylight, about the thickness of a human hair. If the gap is wider, your nut slots are too shallow, making open chords feel stiff. For those who prefer a master's touch with these delicate components, our Luthier Repair Services ensure your instrument returns to peak playability without the risk of over-filing.
Once the relief and nut are verified, the saddle becomes the final arbiter of action at the 12th fret. Here, the math is simple but unforgiving. To lower your action by 1/64" at the 12th fret, you must remove exactly 2/64" from the bottom of the saddle. This 2:1 ratio is a law of geometry. Before you begin, however, inspect the bridge for any signs of lifting or "bellying" in the soundboard. If the wood behind the bridge is rotating upward due to tension, no amount of saddle sanding will provide a permanent fix. These structural warnings require professional attention to preserve the heritage of your instrument.
Humidity is the invisible hand that reshapes your instrument while you sleep. Most players assume that structural changes happen over years, but a sudden shift in moisture can move your strings in a matter of days. If you find your acoustic guitar action too high after a particularly humid week, don't blame the luthier. You're likely witnessing the natural expansion of organic material. Wood is hygroscopic; it breathes and reacts to the air around it. When the relative humidity climbs above the 45-55% gold standard, the wood fibers absorb moisture and expand. Since the guitar top is fixed at the edges by the sides, it has nowhere to go but up. This creates a "wet guitar" scenario where the soundboard bulges, lifting the bridge and the strings along with it.
A "wet" instrument often feels sluggish. The tone becomes muffled and loses its sparkling overtones. Conversely, a "dry" guitar suffers from a sinking top, causing the strings to sit too low and buzz against the frets. You might even feel "fret sprout," where the metal fret ends protrude because the wooden fretboard has shrunk. Maintaining environmental equilibrium isn't just about playability. It's about protecting the long-term health of your collection.
Every acoustic top is built with a slight radius or "dome" to handle string tension. As moisture enters the grain, this radius becomes more pronounced. High-end, thin-finished instruments like those from Lowden are exceptionally resonant because their finishes allow the wood to move freely. However, this artisanal transparency also makes them more reactive to climate shifts. A bulging top is a clear signal that the wood is over-hydrated. For a deeper look at preserving these delicate balances, explore The Collector’s Guide to Humidity to understand how heirloom-quality wood behaves over time.
Patience is a luthier's greatest tool. Never adjust a guitar that has just arrived in a new climate or has been subjected to a sudden weather shift. We recommend the 72-hour rule. Place the instrument in its case with a reliable hygrometer and allow it to reach a stable 50% humidity. Use case humidifiers or silica-based de-humidifiers to guide the wood back to its original dimensions. Often, you'll find the "high action" was merely a temporary environmental phase. Once the wood returns to its intended shape, the strings will likely drop back to their perfect, factory-spec height without you ever needing to touch a tool.
Distinguishing between a minor adjustment and a permanent alteration is the hallmark of a responsible instrument owner. When your acoustic guitar action too high is caused by a simple shift in neck relief, you're in luck. This is the only area where a hex key and some patience can solve the problem. However, once you introduce files and sandpaper, you're crossing into the territory of material removal. There is no "undo" button for a filed nut slot or a heavily sanded saddle. Understanding your limits preserves the value and integrity of your collection.
The "point of no return" arrives the moment you remove wood or bone. If you over-file a nut slot, the string will buzz against the first fret, requiring a full nut replacement. If you sand a saddle too thin or unevenly, you'll lose tonal balance and potentially ruin your pickup system. We always recommend keeping original components intact and practicing on inexpensive replacement parts if you're determined to learn the craft.
Let's clarify a vital point: the truss rod is designed to manage the "relief" or curvature of the neck, not to be the primary tool for lowering action. If your diagnostic check from the previous section showed excessive forward bow, a small adjustment is appropriate. Always use the "Quarter Turn" rule. Turn the nut clockwise to tighten the rod and flatten the neck, then wait. Wood takes time to settle. Force is your enemy; if the rod feels stuck, stop immediately. Different brands require specific tools. For example, Collings instruments typically utilize a 5/32" hex wrench, while Gibson acoustics often require a 5/16" pipe wrench. Always verify your tool fit before applying any torque.
Sanding the saddle is the most effective way to lower action at the 12th fret, but it's a high-stakes task. The primary benefit is the ability to customize the feel to your exact playing style. However, the risks are significant. The bottom of the saddle must remain perfectly flat. If it leans or becomes rounded, it won't sit flush against the bridge or the piezo pickup. This leads to "weak" strings where one string sounds quieter than the others when plugged in. You also risk ruining the intonation if the top of the saddle isn't shaped correctly. Before you begin, we suggest purchasing a spare bone saddle to ensure your guitar isn't out of commission if the first attempt goes wrong.
If the thought of taking sandpaper to your prized instrument feels daunting, our master technicians are here to help. Explore our Luthier Repair Services to schedule a professional setup that guarantees perfect playability without the DIY risk.
High action isn't always a matter of simple adjustments. Sometimes, it's a distress signal from the wood itself. If your acoustic guitar action too high remains a problem after you've stabilized the humidity, you must look for signs of structural failure. This is where the artistry of construction meets the reality of physics. When an instrument's geometry shifts beyond the reach of a truss rod or saddle adjustment, it's often due to one of these critical issues:
You can diagnose a failing neck angle with a simple 24-inch straightedge. Lay the ruler on its edge along the center of the frets, extending it toward the bridge. Ideally, the end of the straightedge should rest exactly on top of the wooden bridge. If the ruler hits the front edge of the bridge or lands significantly below the top surface, your neck angle has collapsed. This geometry shift necessitates a "neck reset," a complex procedure where the neck is removed and the heel is recut. This isn't a DIY task. It's a necessary investment to preserve the life of an heirloom guitar, as no amount of saddle sanding can fix a fundamental misalignment of the neck.
Understanding the difference between a routine setup and a structural repair is vital for any collector. A setup involves non-destructive adjustments to the nut, saddle, and truss rod to optimize playability. A structural repair, however, involves regluing components or correcting the instrument's build. Heirloom-quality instruments from makers like Boucher or Atkin are built with such precision that they deserve the hands of an expert. These guitars are masterpieces of artisanal skill, and maintaining their integrity requires specialized knowledge of traditional glues and construction methods.
Don't let a difficult instrument dampen your passion for discovery. If your acoustic guitar action too high has made playing a chore, seeking professional help is the best way to reignite your creative spark. Our Luthier Repair Services are designed to restore the effortless playability and tonal brilliance your instrument was born with. A perfectly set-up guitar doesn't just feel better; it invites you to explore new melodies and play with a level of confidence that only a masterfully maintained instrument can provide.
Your journey toward effortless playability begins with understanding that high action is a symptom, not a permanent state. By following the three-step diagnostic hierarchy and maintaining a stable 45-55% humidity level, you've taken the first steps in preserving your instrument's legacy. Whether you're adjusting for a lighter fingerstyle touch or ensuring your bridge isn't lifting under tension; knowledge is your most valuable tool. If you find your acoustic guitar action too high, remember that precision is key to maintaining tonal brilliance.
Searching for your next heirloom instrument shouldn't involve guesswork. As an Authorized Martin Custom Shop Expert Dealer, we ensure every guitar in our gallery undergoes an Expert Luthier Inspection to guarantee flawless geometry from the moment it arrives. We offer national shipping with climate-controlled handling to protect the delicate balance of the wood during transit. Explore our collection of perfectly set-up premium acoustic guitars and discover the difference that artisanal care makes. Your perfect tone is waiting; it's time to let your music breathe.
Yes, higher string height generally provides more volume and headroom by allowing the strings to vibrate more freely without hitting the frets. This is why aggressive flatpickers often prefer a taller setup. However, it can negatively impact intonation because the extra distance required to press the string to the fret stretches the metal, often pulling the note sharp.
A truss rod adjustment only lowers the action if the primary cause is excessive neck relief. While tightening the rod flattens the neck and brings the strings closer to the fretboard in the middle register, it's not a primary tool for overall height. If your neck is already straight, you'll need to look at the saddle or nut to address the height at the 12th fret.
General industry data for 2026 suggests that a basic setup typically ranges from $40 to $90, covering truss rod and intonation adjustments. More comprehensive standard setups that include nut slot filing and fret polishing often fall between $70 and $150. These rates vary based on the luthier's experience and the specific needs of the instrument.
You can certainly manage minor truss rod adjustments at home, but altering the nut or saddle involves permanent material removal. If your acoustic guitar action too high is caused by a tall bone saddle, DIY sanding is possible but risky. Without specialized files and a perfectly flat sanding block, it's easy to create an uneven surface that ruins your tonal balance.
Summer humidity causes the organic wood fibers of your guitar to absorb moisture and expand. This swelling typically occurs in the soundboard, causing it to dome upward and lift the bridge. When this happens, you'll find your acoustic guitar action too high until the instrument is properly dehumidified and returned to a stable 45-55% relative humidity environment.
High action is a significant advantage for slide players because it prevents the heavy slide from clattering against the fret wires. Similarly, heavy strummers benefit from the increased clearance, which allows the strings to oscillate widely without buzzing. For these playing styles, a setup that leans toward the higher end of factory specifications is often a deliberate choice.
Sanding a saddle too low results in immediate, pervasive fret buzz and a noticeable loss of sustain. Once the material is gone, you cannot simply add it back. You'll likely need a full replacement bone saddle, which industry averages place at approximately $60 for the part alone, plus the cost of professional labor to shape and intonate it correctly.
Your guitar likely needs a neck reset if the action remains high even after the saddle has been sanded down to its lowest possible point. Use a 24-inch straightedge laid across the frets to check the geometry. If the end of the ruler points significantly below the top of the wooden bridge, the neck angle has shifted, indicating a structural issue rather than a simple setup problem.